

sterling
-
Posts
51 -
Joined
-
Last visited
-
Days Won
6
Content Type
Profiles
Forums
Raffles
Posts posted by sterling
-
-
Foreword
Hi guys, it's Ster once gain with another comprehensive guide on every Elite Dungeon in Velheim.
This is it, the final and easily most anticipated one yet, and easily my favorite of all the 3. ED3- or The Shadow Reef. Easily the hardest one to solo, and one of the most rewarding to solo. At the time of making this guide, I have 698 full clears of this dungeon. Out of all of them, over 250+ have been solo. I get asked often how to properly complete this dungeon by yourself, and this guide will hopefully show you exactly how to do it, but will also show you how to run it with friends as well.
Why should you solo?
The final boss encounter of the dungeon, being The Ambassador, drops the parts to make the Eldritch Crossbow- a 2h Ranged weapon with perhaps the strongest special attack in the game. The Ambassador's drop rate for these pieces is significantly increased when less players are in the instance. Even for a 200x account, the pieces are roughly the same base drop rate as any Nex equipment drop.
Solo is difficult, and takes time to master. When you figure it out, though, you will reap the rewards in abundance!
So, let's just dive right into it, and make some crossbows!
Presets and Equipment
SpoilerIn ED3, you will be bringing a hybrid of Magic and Ranged. Magic for most of the routing/mobbing, and Ranged for every boss encounter.

Footnotes: Equipment
- My go-to setup of Full Elite Tectonic, with Wand of the Praesul and Kalphite Rebounder. Rebounder is incredibly useful for certain areas of this dungeon, especially against the Necromancer mages. Praesul wand itself holds its own and does a good amount of damage, as well.
- Essence of Finality (or) with Eldritch Crossbow special attack stored inside. I use this special all the time during this dungeon, but it's certainly not required, and more than likely you won't have it starting out here. Substitute the special attack for:
- Magic Shortbow for strong burst damage against single targets.
- Guthix Staff to reduce the defenses and affinity values of a single target.
- Zuriel's Staff to annihilate a group of enemies.
- Hand Cannon for memes.
- Completionist/Max/Skillcape to maintain hybrid stats amongst your switches. Nothing new here.
- Cinderbane gloves to maintain T85 hybrid stats and to increase the potency of weapon poison.
- Hailfire boots for the Best in Slot boot.
- Ring of Death to restore all the special attack bar I use while mobbing. Also helps a lot if you get put into a dangerous situation that you can't possibly survive.
- Illuminated Book of Chaos to do Area of Effect burst damage to whatever gets hit by me.
- Ruby Bakriminel Bolts (e) to do damage on proc based on a target's current HP. The higher, the better. Bring an ammo swap in your inventory for when the target is below about 40% HP.
Footnotes: Inventory
- Your best overload you can make- highly recommend it's at least a Supreme Overload Salve. I will be using Elder Salves here, though.
- Two ammo swaps. Black Stone Arrows, to reduce the armor of a single target up to a percentage. These things work wonders in the background, and do not get used up on proc if shot by a Seren Godbow. Onyx Bakriminel Bolts (e) for after our target has less than 40% HP, but can also be used to sustain yourself through healing without losing much damage (25% damage on activation)
- Enhanced Excalibur to passively heal ourselves in a fight.
- Two rings. Asylum's surgeon Ring (i) for its unique passive of reserving special attacks. As stated, I use ECB spec very often here, so I always need reserved spec. Hazelmere's signet ring to potentially double your rare relics, or the best outcome, ECB Pieces.
- Adrenaline Flask to restore special attack where Ring of Death cannot.
- Weapon Poison++ to do additional damage to everything that can be poisoned. It's free damage, can't go wrong.
- Seren Godbow + Ascension Crossbow mainhand and Kalphite Repriser off-hand. Use SGB spec often, and swap back to your crossbows after.
- Staff of Sliske to combo with dual wield wand and rebounder.
- Full Elite Sirenic with Flarefrost boots for maximum ranged bonus.
- Xp Capacitor 5000 to passively level up during runs. Not necessary, but useful to have.
- Steel Titan Pouch in your inventory, not actively summoned. We will go over why down below.
- Salve Amulet (e) to do bonus damage vs the undead. Very useful to have during Area III, as most things there are undead. It is also effective against the 2nd boss encounter of the dungeon, Taraket the Necromancer.
- Spring Cleaner 9001 to passively alch rune salvage drops.
- Rune Pouch with Blood and Ice Barrage runes.
- Illuminated Book of Law to use against single targets that are standing still, or can be fully controlled movement wise.
- (Super) Saradomin Brew flasks, or stackable food like Jellyfish, alongside a Divine Spirit Shield for emergencies and tanking certain hits.
Equipment Perks
All perks follow the standard of the Ancient Invention Handbook (Topic 3435) with the inclusion of Undead Slayer fitted into your legs.
That's all we should need to do a full clear. Hop in the boat at the Shadow Reef teleport, and prepare to begin.
Floor I: The Shadow Reef Entrance
SpoilerThe Shadow Reef consists of 3 floors in descending order. beginning at the highest elevation.
You will begin at 'Entrance'. Walk backwards as you enter the instance to activate the 'Shadow Reef Entrance' chest.
Directly ahead of you at the beginning are 2x Crassian Scouts, and 3x Crassian Scuttlers. Follow these arrow paths to lure them all into stacks to AoE down. The scuttlers should be the first to stack up, with the Scouts being second. Once all are dead, the gate will open and you will proceed forward.
3x Crassian Scuttlers and 3x Crassian Scouts. Run past the Scuttlers, and gain their attention. When you're in range, attack the center Scout to have your barrage hit all 3 of them. If the middle one dies too fast, simply route a step or two back from the endpoint of the arrow, and they will stack up. Kill the remaining scuttlers behind you. Proceed past the gate, and move up the hill.
Note: You should not have a familiar summoned this entire first part. Familiars will often pull aggro from certain enemies, ruining your clears. For example, the scuttler closest to me would take aggro from my titan, and it would secluded from the group of 2 next to him. It's just a lot more work for not much benefit.
At the peak of this slope, there are 2x Crassian Scout, and 3x Crassian Warrior. Follow the arrow path, and throw an attack out at the most centralized one to gain all of their attention. Route backwards to stack them up. The scouts will likely die first, as warriors have a sizable amount of HP to punch through. Kill all 5 enemies, and continue forward past the gate.
Take care of the 2 mages directly ahead of you. They will spawn weaker variants of Crassian Warriors en masse if not dealt with quickly. Continue down the path after the gate opens. You will gain the attention of everything on path, but you only need to kill the 2x Scouts and 2x Zealots. Follow the arrow paths to route them into a position that looks like this:
You'll be able to hit nearly all of them at once here, with Aftershock likely taking care of the 4th of the group. Once these 4 are dead, proceed forward into the next area.
In this area is a large cluster of zombies, and Bossy McBossface, the miniboss that can possibly drop Swordy McSwordface. Follow the arrow paths, and gather up every zombie onto a stack. Alternatively, you can hit Bossy as well to serve as a giant hotbox to barrage around, without having to stop attacking due to the target dying. Once the zombies die, the gate opens. Walk across the ship mast into the next location.
At the end of the mast, there are a few zombies roaming around. Tuck into the corner at the gate, let them corral together, and kill them all. Proceed past the gate and activate 'The Crassian Leviathan' chest. The only enemies ahead that you need to clear are the 2 mages at the gate ahead, but it's generally a good idea to clear even the scuttlers before the first boss encounter of the dungeon. Once you feel content with your surroundings, proceed into the arena where The Crassian Leviathan waits.
The Crassian Leviathan
The leviathan will be located at the end of the arena, head sticking out of a shipwreck. He will be non hostile until provoked. When you're ready to begin the fight, position yourself against the wall to your right.
Vital Information
Follow either one of the arrow paths when you enter into the arena. Where I am located is the 'safe zone', and said location is parallel to the opposite wall. Each of the Xs marks a Hydra head that comes out of the wall. These will periodically attack you, and when they do, they will deal heavy poison damage, and stun you for up to 6 seconds straight giving them just enough time to almost stun you again afterwards. Pay attention to what is going on if the Leviathan switches sides during the fight, as you will have to walk past the Hydra heads- equipping defender/shield as you run will make sure you make it to the next safe zone with no problem.
The rectangle in the center of the arena is roughly the hitbox size of his poison breath attack.
Poison Breath
One of the first attacks the Leviathan will do is this torrent of poison in the center of the arena. It will reach all the way down the middle, but you are safe on the sides of the arena. If you have a familiar out, dismiss it immediately before this attack comes out. If your familiar gets hit by this attack, you will be infected by poison that hits rapidly, and will not go away until the Leviathan dies. This poison is not to be underestimated. It is heavy DPS towards the player, and you will end up consuming your resources to survive, or even very quickly dying.
Head Sweep
The Leviathan will launch an auto attack out, and then proceed to his next special attack. He'll choose a random side, either left or right of him, and sweep his entire head across the arena in front of him, dealing heavy typeless damage rapidly to whoever is in range. As long as you are in the 'safe zone' areas, this will not hit you. However, if you're using melee, it's a complete guessing game which side he's going to pick as of currently due to his animations. He will do this sweep twice, and the second sweep will always be opposite of the first one. (1st sweep comes from the left, 2nd will come from the right)
The Leviathan will also passively heal himself throughout the fight. This heal can be largely negated by poisoning him.
After the head sweep special ends, he will swap sides of the arena, and reset his attack rotation.
Continue doing damage until he reaches 0 HP, and proceed through the shipwreck he had his head at, taking a left once you exit the other side.
Follow the path down until you see something like this. Aggro the Crassian Warriors, and attack the 2 Scouts next to eachother ahead with AoE. Turn around and deal with the warriors once the scouts are dead. Push up to the scuttlers and the mage, advancing to either side of the mage, and barraging the entire cluster of scuttlers with him. Once all the enemies here are dead, the gate will open.
Past the barrier resides another barrier, occupied by a large group of zombies. Nothing crazy here, just tuck into a corner at the gate, and kill them all at once. Proceed past the gate, and follow the path down until you are able to jump down the cliff. Proceed to jump down, but keep in mind there is no way back up outside of teleportation.
Upon landing, path around to where the arrow is pointing to gather up every mob on one spot. This is located right next to the necromancer, and all the other enemies here are melee. Barrage them down, and proceed past the gate into the stone structure.
Left or right, the only enemies you'll have to kill in this room to proceed forward is the 3 zombies inside the rectangle. Here is a good location to have your wand & rebounder ready, as necromancers will cast Asphyxiate on you, and stun you on the spot. This, combined with the mass amount of enemies they spawn, can result in a very quick death. Continue deeper into the dungeon by entering the doorway.
Floor II: The Temple Entrance
SpoilerThe mid-section of the dungeon, consisting of mostly undead enemies. You will begin at 'To Floor 1'. Activate the 'Temple Entrance' chest, and proceed down the stairs into the next room.
One of the most interesting rooms to route around, we have the double artefact room before the bridge. I still don't believe I've 100% mastered the technique here, but this is about as good as I can find so far. Start by making your way into the room, and tag Necro #3 with a hit, and follow the path arrow to the side of Necro #1. Necro #2 will follow you without even getting hit.
If Necro #2 and #3 were lured properly, they will both end up on the X mark. You can either pull all of the summoned undead over to them to gain the most aoe healing/damage at once, or finish Necro #1 off first, then focus on them. I prefer the first option more, as all of the summoned adds can be very overwhelming after only a small amount of time. Once a certain amount of skeletons, armored zombies, and necromancers die, both gates next to Necro #3 and #1 will open.
In each of these side rooms is a Black Stone Artefact. You must activate them both to open the gate to the bridge. There is a 4th Necromancer in the room but it can entirely ignored and even not hostile if pathed around in a specific way.
The line that intersects the path indicates his aggro range. Stay on path with the route arrows to remain completely untouched. Proceed past the gate onto the bridge.
At the end of the bridge is 1 Necromancer, next to 2 Sea Horrors. It's recommended that you pull the necro backwards a few tiles, then get next to him with the sea horrors to aoe. Sea horrors occasionally will go berserk, and hit you for typeless damage upwards to 1000+ (100+ in 718). In small amounts, this is trivial, but multiple horrors doing this at once could add up quickly.
The barrier will open when the necro and horrors die. Ahead is one Sotapanna and another horror. Neither one has to die to open the gate to the west of them, but you will want to kill the Sotapanna due to him dead sprinting at you, and having the ability to stun.
At the next gate are 3x Sotapanna. Attack the one in the center and they'll all collapse onto you, conveniently creating a stack of melee enemies to barrage down. Proceed into the next room.
Ahead are 4x Sotapanna, in a diagonal line. They cannot be ignored, and cannot be outran. You have 2 options to take them out- the first is following the arrow path towards the staircase, and tagging the X marked target with a full attack cycle. This will hit every Sotapanna in the line, and may even kill a few of them.
Otherwise, you can follow the arrow path towards the stairs, then follow the branching path to the side of the 4th Sotapanna in line. They will all corral next to eachother when you end up there, and you barrage them down until they drop dead. Continue by going down the stairs and around the corner into the next room.
The last gate before the 2nd boss encounter of the dungeon. 2 Necromancers and 2 Huge Skeletons are required to die to move forward. Above, there are 2 seperate ways to go about doing this effectively- The necro pull, and the necro push. The southern arrow path will have you walk underneath the necromancer it is pointing at (right clicking 'walk here' on his location). This will displace him and force him next to the other necromancer, creating a barrage stack with the skeletons. This is the Necro Push, and is the most popular way to clear this section.
Otherwise, you would take the northern set of arrow paths, where you tag either of the necros, then route backwards to stack the skeletons and necromancers up while they're in motion. This is the Necro Pull, and is a safer but much less consistent way of doing this section. Whichever way you decide, the gate will open after all 4 of the mobs are dead. Activate the 'Necromancer's Amphitheatre' chest, and get ready for the 2nd boss encounter- Taraket The Necromancer.
Taraket The Necromancer
Vital Information
(1) Where Taraket will be for the majority of the fight outside of occasionally moving to the crystals on the sides of the arena.
(2) Bloated Monstrosity's starting point.
(3) Corpse Carrier's starting point.
Taraket is considered by many to be the hardest boss in the dungeon to successfully and consistently solo. He can be very overwhelming with the skeleton spawns, and his minions can quickly create unbeatable scenarios if not planned around carefully. Taraket will be non hostile until provoked. When you're ready, start to attack him.Taraket attacks with Magic primarily, of which these attacks are quite accurate and hit up to 2,000[200]HP in damage. You should use your Black Stone Arrows as your first few sets of attacks in order to lower his defenses for the fight. He will auto attack 6 times before his first special attack in rotation, Rift of Undeath.
Rift of Undeath
Taraket will summon a Rift of Undeath nearby, marked by a yellow blinking arrow above it. This will have 2 health bars, one for its actual HP, and the other being a timer for its detonation. These rifts have 15,000 HP (+15,000 per additional player in the instance) so during a solo, they will have 30,000 HP in total. While they are active, skeletons will periodically appear from it in groups of three at a time. Players should try to get rid of these rifts as fast as they possibly can to alleviate themselves of a painful fight full of adds + Taraket hitting you.
As mentioned above, it has 2 bars for HP and its detonation timer. The detonation will occur when this bar reaches the end, and when it does, it can deal up to 7.5k (750) typeless damage to everyone in the arena. Try to always prioritize getting rid of these when they appear, as they can make the difference between a clean and a very messy fight experience.
Bloated Monstrosity
Upon reaching 200,000 HP (20,000), Taraket will fly (walk) over to the right side of the arena, and will have immense damage reduction while he moves. When he reaches the crystal, it will Uber Heal him, and The Bloated Monstrosity will spawn on the field.
As long as it is alive, Taraket will do additional damage with every auto attack he does. In teams, this can be ignored and fought through, but it is highly recommended you dispatch of the giant immediately in a solo encounter. You should try to do as much damage as you can to the monstrosity before Taraket reaches his initial spawn point and begins attacking you again.
The giant has 45,000[4,500]HP (+45,000 per player in instance) adding up to 90,000[9,000]HP in total in solo.
Corpse Carrier
Upon reaching 200,000[20,000] HP once again, Taraket will move to the western side of the arena, once again gaining damage reduction. He will absorb the crystal, uber heal, and the Corpse Carrier will come with it.
The Corpse Carrier is effectively a much more durable and moving version of a Rift of Undeath, that very frequently spawns skeletons. You must prioritize damage on the carrier as soon as possible. As long as the carrier is alive, skeletons will seemingly continuously spawn, which can lead to an onslaught of attacks all at once- resulting in a quick death that cannot be sustained.
Deal as much damage as you can to the carrier before Taraket reaches his initial spawn point on the walk back.
Skeletal Siphon
When Taraket reaches a certain HP threshold (Roughly 300,000[30,000] HP), he will account for every skeleton currently alive in the arena, and siphon all of them for their HP, killing them in the process. Each skeleton siphoned will heal Taraket by 4,000[400]. In the picture above, you can see why Corpse Carrier is so dangerous- before he died, he managed to summon 15 skeletons, all of which attack you at the same time.
It is important to note that Taraket will not use this ability unless there is at least 10 skeletons active in the arena. One should attempt to keep track of how many skeletons are alive at any given time period to know exactly how to force a heal out. Taraket will always perform this ability after the Corpse Carrier has spawned, and he has reached his initial spawn point once again.
Players should take advantage of the fact they can force heals to take the heat off of themselves from all the adds in the arena. It could make your kill take longer, but it is a safe way to secure kills if done correctly.
Shroud of Darkness
Taraket will cast a shroud around him, making into a static target, meaning you cannot interact with him if you click off of him, and will have to wait for the shroud's duration to end. When inside of the shroud, Taraket will temporarily use ranged attacks that have increased damage over his magic attacks. They can hit up to 4,200[420] damage, and should be respected for such.
When the shroud's duration ends, you may freely click on Taraket again, and he will begin attacking with Magic once again.
You should continue DPS against Taraket, while prioritizing rifts as they come out to ensure he cannot heal back the damage he's taken. Players should continue to keep count of how many skeletons are currently active to avoid any chance of siphons. If the skeletal body count is up to 6+, its time to start clearing some of them, or kill him as fast as possible- as the next rift that spawns will more than likely cause a siphon. When Taraket finally dies, the gate behind him will open, and you will proceed deeper into the dungeon.
Specific Situations & Scenario Priority
Taraket is largely a fight based around split second decision making. I thought up of some scenarios I've had to deal with in the past, and will give solutions to all of them.
- Corpse Carrier spawns, and a rift spawns after. This is the only time you should not prioritize the rift but rather the Corpse Carrier. Rift will spawn up to 9 skeletons over its entire duration, but Carrier continously spawns sets of 3. You can avoid this happening entirely by letting the rift spawn before Taraket reaches his HP threshold to go summon Carrier.
- Corpse Carrier dies while Rift is out, but its about to detonate. If this happens, just grit your teeth, get your spirit shield out, and tank the hit. There is nothing you can do at that point, and it's okay to just let the rift blow up.
- Corpse Carrier dies, and there is above 15 skeletons on the field at once. What do I do? The simple solution is immediately start DPSing Taraket down above all else. You will have to go through resources during the initial onslaught, but once you force the heal, it's pretty much a guaranteed kill.
- Bloated and Corpse Carrier are alive at the same time. This is a scary scenario, honestly. I think I've only had this happen a couple times in teams, but definitely once in solo to see how it was. I think in this scenario, you should prioritize Carrier at first while Taraket is walking back, then swap over to Bloated while Taraket siphons the skeletons on field.
- Bloated, Corpse Carrier, and a Rift are all active at the same time. Just teleport out, its FUBAR at that point.
- Shroud of Darkness gets cast while a Rift is out, what should I do? It sucks, but you should click off of him onto the rift. Even if you one shot the rift, you'll have to wait until the shroud is gone. Clear any skeletons that made it out of the rift, and back on Taraket when you can.
Post Taraket, go down the stairs into the room with some zombies and an Undead Witch. The witch doesn't move in melee distance like the zombies do, so stand next to her and barrage them down accordingly to open the gate. In the next room are some more zombies and a Kal'gerion Demon. Tag the demon, and stand roughly where I am at the doorway. The zombies will naturally corral themselves over to you, and you can barrage them alongside the demon. When all are dead, the gate up the stairs will open. Proceed through it, equipping your shield or defender before so.
Ahead of you is a room full of Kalg Demons, including a miniboss. Equip a shield or defender when going through this, as they often stun you. Follow the arrow paths up to the one nearest the gate. There are 2 Necromancers, one at the beginning of the hallway (where I am), and one at the end behind a wall. Both must die to continue past the barrier.
Proceed past the barrier, and take a left toward the lone Necromancer, not toward Oreb, The Magister. There are 2 necromancers ahead, and both need to die in order to open the gate nearest the 2nd Necro. When both are dead, proceed past the barrier and click on the ledge of the cliff to your right. Your character will jump off the cliff, and float down to the final floor of the dungeon.
Floor III: The Abyssal Depths
SpoilerThe final and shortest floor of the dungeon. You will begin at 'to Floor 2'. This is a good time to bank, whether from the Elite Dungeon chest or having to teleport out, as you are very close to the final boss encounter of the dungeon. When you are ready, proceed down the path, having already activated 'The Abyssal Depths' chest.
Hug the southern wall while moving forward, as to not gain aggro of the Black Stone Scuttler miniboss circled in the picture. Follow the arrow path to run into a whole bunch of crabs that have to die in order for the barrier to open. Continue forward after the barrier falls.
Down the hill are 2 Warped Skeletons. These guys hit hard, accurately, heal from hitting you, and have a huge amount of Magic defense. They also have minds of their own, and will simply roam away from you. I recommend swapping to Ranged just to get rid of these guys, or you're going to be here for a minute. Following the arrow path, you will see an X mark at the end of it. This is where you should stand in order to aggro all of the 3x Zealots ahead. Barrage AoE them, or try SGB Spec on the far left one. If you're fast enough, you can SGB Spec into your magic setup without losing too much time and damage. Once they're taken care of, continue to follow the arrow path forward.
Ahead of you is the final barrier before The Ambassador encounter. There are a few Warped Skeletons, 2x Crassian Scouts at the gate itself, and 3 possible miniboss spawns. Spawn 1 and 2 will always aggro you, while Spawn 3 will not as long as you hug the wall, and nothing gives him a reason to become aggressive. In speed runs, I ignore the miniboss spawns entirely by having my familiar take aggro by making it attack only the miniboss. As long as you don't attack back, it'll hop onto your familiar instead. Use that time to run down the hill into the arena, and hit Ambassador before they reach you. Otherwise, simply kill the miniboss before continuing into the arena.
Follow the arrow path, and kill the 2 Scouts only to open the barrier. Be sure to toggle the chest off before you go into the final boss encounter. The possibility of getting an ECB piece doubled is too good to ignore, and Ambassador's normal loot is also fantastic to have double.
When you are ready, proceed down the hill and into The Ambassador's arena.
The Ambassador
The Ambassador has a total of 1,000,000 HP[100,000] and attacks with all 3 combat styles, only Ranged and Magic from a distance. He resides in the center of the arena and will remain there the entire encounter. He will always begin the fight with a melee/magic hit, then proceed to use Ranged auto attacks for the 5 in rotation before his first special.
His magic attacks are to be taken seriously, as they have a detonation radius, and can hit up to 3,500[350] every hit. Stay away from teammates if you have any, and be prepared for these hits when they come out.
Vital Information
In the picture above, Numbers 1 to 6 indicate roughly where the Sinister Fragments will spawn.
The lines coming from The Ambassador show where the Energy Beams will originally be as soon as the special attack starts.
The square outline is where you should place the Purple Corruption when it lands, as to be completely out of your way while pathing around. Simply step under him as its about to drop, then run back to your original location.
Purple Corruption
After The Ambassador does his initial Magic attack + 5 Auto Attacks, he'll mark you with corruption. A secondary HP bar will begin to fill, and when its full, purple smoke will drop underneath you. While you are inside of it, you will take rapid 2,000[200] hits. This special has a unique interaction where it will track where you go and trail behind you. If you wish to not have it trail, you will need to tank at least 2 hits from it, then move off your spot.
Be sure to not place the corruption in your forward pathing area, or where your teammates will go if you have any.
The Ambassador will do this special attack twice before the Energy Beam special attack occurs.
Black Hole
Shortly after you place the Corruption down, The Ambassador will summon a black hole (+1 for each player in the instance). The black hole has incredibly high HP, and cannot be killed before it detonates. You only have two options to counteract it.
As it says in the picture above, all these forms of crowd control can immediately make the black hole cancel. Entangle, Ice Barrage, and Bolas are good examples.
If you have no crowd control available, you can only run from it. The explosion is about half of the arena wide, so if you plan on doing this strategy, its a good idea to pre-emptively run to the sides of the arena, and let it place there.
If someone is caught in the explosion radius, they will take 8,000[800] to 10,000[1,000] damage. Play it safe with these, and swap to your crowd control after you place your corruption down to give yourself plenty of time to stun it. All else fails, run to the edges of the arena before it appears, then run to the opposite side as fast as you can.
The Ambassador will do 5 auto attacks after Black Hole, tag you with Corruption once more, then will begin his next special in rotation if the HP threshold of 550,000[55,000] is not met.
Energy Barrage + Sinister Fragments
The Ambassador will fling out 6 fragments from himself in a hexagonal pattern, surrounding the arena. He will then fire an arena wide beam north, south west, and south east from him that will slowly rotate counterclockwise around the arena.
This special will immediately begin if the 650,000[65,000] HP threshold is met, and can be skipped entirely if you get to the 550,000[55,000] HP threshold, but this will be very unlikely in most teams, and extremely unlikely solo. You will want to place yourself in the location that Fragment #1 and #2 are to have a comfortable location before the special starts.
Players must move with the rotation of the beams, while dealing with the 6 Sinister Fragment spawns. The energy beams themselves deal up to 6,500[650] soft typeless damage every tick. It is crucial that you kill each of the 2 in every section as you pass by them, because you will not be able to go back and hit them again. There is one exception, being Sinister Fragment #1 and #6 (Vital Information), where you can double back on them before the full rotation ends.
The Ambassador will absorb all remaining fragments at the end of the Energy Barrage. If he absorbs none of them, he will repeat his Phase 1 rotation until he reaches 550,000[55,000]HP.
For each one absorbed, The Ambassador will gain temporary damage reduction, with a shockwave attack that can hit over 6,000[600]+ damage with no damage soak. This attack will happen once for every fragment absorbed, several seconds between each other.
Crassian Ritual Keepers
When 550,000[55,000]HP is reached, The Ambassador will send out a set of Ritual Keepers, all of which have very long attack range, and very high damage reduction toward them. Outside of doing moderate amounts of damage, these can largely be ignored and one should focus on damaging The Ambassador down to 400,000[40,000] HP to proceed to the final part of the fight.
Seiryu's Intervention
When The Ambassador reaches 400,000[40,000] HP, Seiryu will appear from the shadows. He will heal all players to full in the instance one time, and immediately kill all ritual keepers, alongside cleansing corruption in the arena.
Seiryu serves purely as a quick bit of support before the final phase begins. (a true hero)
Players should continue doing damage to The Ambassador while Seiryu intervenes.
Twelve Black Hands + Magic Barrage
The Ambassador will subdue Seiryu, and begin his ritual by summoning twelve black hands that surround the arena. They will immediately heal him for 30,000[3,000] HP, and will continue to heal in small amounts as the fight continues. The only way to counteract the heals is to rotate around the arena with the hands that are firing orbs out. They rotate clockwise, so you should follow. You need to be in front of the hand's path before the hand tosses the orbs out. You will take typeless damage by blocking the heal, but will make him not heal in the process.
After roughly 3 auto attacks from when the hands appear, The Ambassador will target someone in the arena. Whoever he targets, he will say their name in the chat.
He will then launch out a sequence of 5 orbs, all which can hit up to 9,000[900] HP each. You cannot survive this attack without some sort of damage reduction. There is no shame in mage praying with a divine on to tank this attack, because even with all of those, you'll still take a lot of damage. He will do this every 10 auto attacks in the final phase.
Note: The Ambassador does not follow his standard auto attack rotation during this phase. Any if not all of his attacks can be either ranged, melee if you're close, or magic.
Players should focus on trying to do as much damage as they can before the next magic barrage attack occurs, or they'll quickly go through all of their remaining resources.
Continue doing damage to The Ambassador, while somewhat paying attention to the hands in rotation. Once he dies, he will drop all of his loot directly below him.
Congratulations on your completion of The Shadow Reef!
Conclusion
And that's it. The final Elite Dungeon guide is finished! This one felt like a HUGE info dump, but I'm happy about it and the new subsections I tried with this one.
ED3 is definitely my favorite one to run, with the highest reward of them all. You will see below just how many crossbows I've made in all my full clears- although I only got about 2 of the 3 pieces constantly for a good while there.
I hope you guys learned a lot from this three part series, and I expect to see more full clear milestone broadcasts in game because of it.
I'd like to give thanks to everyone that's ran this dungeon with me. Being able to share our strategies together is what made this possible, and why I even became the Elite Dungeon Master in the first place.
Thank you! @foxx @shiny shinx @Fulltimewife @asgardian @NubonmyPC @Esker @EilaIf I didn't include you it's because I couldn't @ you, or just simply didn't remember to. Sorry if that's the case!
If you guys want me to make any more guides in the future, let me know in game or over Discord. I'll definitely consider making more of this sort of thing!
Until then, good luck and have fun.
- ster
Final Collection Log & Pet Showcase
(This is the picture taken as I completed log. Since I still do ED3, this doesn't match the live collection log. I will provide the current one further below.)
Ambi
-
 6
6
-
 1
1
-
 8
8
-
 1
1
-
Foreword
Hi guys, it's Ster again with another comprehensive guide on every Elite Dungeon in Velheim. This time, we take on what I think is the easiest amongst the 3 dungeons to do, ED2- or the Dragonkin Laboratory. It's also one of the shortest ones, with an average solo for me being 14-15 minutes only. Despite its shortcomings, it is still fun to do, speedrun or not. Besides, how else are you going to upgrade your Tectonic? I'd like to leave off this foreword with a shoutout to @Fulltimewife for showing me basically everything I know about this dungeon. Thank you!
Let's get into it.
Presets and Equipment
SpoilerIn ED2, you will almost primarily run Ranged if you have a Seren Godbow, as well as a mage swap for the beginning. If not, you will be using both Ranged and Magic. Solo or not, preset is kind of specific for the best efficiency.
Footnotes: Equipment
- Completionist cape/Max Cape/Skill cape for hybrid bonuses among Ranged and Magic, as well as Cinderbane Gloves to maintain hybrid stats, and increase poison damage.
- Elite Tectonic is what I have, but is what some of you are here to get in the first place. Use your best magic top and robe bottom, and your best magic weapon- dual wield or 2h.
- The best slayer helm upgrade you have. You will gain the benefits of the helmet on a Dragons task for this dungeon. Therefore, I see no better option.
- Essence of Finality (or) with Eldritch Crossbow special attack stored. If ECB is not an option, MSB is your best bet for this dungeon as you will be able to use it a lot. If Essence of Finality is not an option, Amulet of souls/Blood fury are decent alternatives.
- Ring of Death to restore special attack as you route. Most of the mobs in this dungeon have a sizable pool of hp, so each kill is a good chunk of spec back. It's also good to camp this ring in a dangerous situation so you don't lose your charges or auras.
- Illuminated Book of Chaos slotted first, with a Illuminated Book of Law and a Book of Wisdom. You only need 2 of them, but I take all three.
- Dragonbane arrows in the ammo slot. These prove to be extremely effective vs dragons, and Seren Godbow gains the benefit of extra damage to dragons with them.
- Aura slot should be in priority order from greatest to least: Dark Magic, Reckless, Vampyrism, Accuracy auras (Sharpshooter, Runic Accuracy, etc)
Footnotes: Inventory
- Your overload should be a salve variant, or one that has antifire. If you have the Bad Breath perk, this isn't as important. The dungeon mainly consists of dragons, so antifire is absolutely needed.
- Xp Capacitor 5000 to passively level up while running the dungeon. Not necessary, just something I like to bring.
- Enhanced Excalibur for the heal on activation.
- Weapon Poison ++ to couple with Cinderbanes- most of the enemies in this dungeon can be poisoned, so take advantage of it!
- Adrenaline Flasks for restoring special attack. Shouldn't be too necessary for this dungeon with Ring of Death slotted, but useful for bosses nonetheless.
- Asylum's surgeon Ring for its special attack reserve passive. Use it for bosses only. Hazelmere's signet ring for the final encounter of the dungeon to possibly double your draconic energies.
- Seren Godbow is going to be your mainhand almost the entire dungeon if you have it. It combined with the Dragonbane Arrow effect are very effective.
- Ascension Crossbow Mainhand & Kalphite Repriser Offhand (Asc Offhand) with Onyx Bakriminel Bolts (e) for the black hands at Black Stone Dragon. Also good to use for Verak Lith pillars.
- Elite Sirenic Top with regular Sirenic chaps as a swap for me- I take Genocidal + Dragon Slayer on these chaps, so instead of my Elite chaps, these get used for this dungeon.
- Illuminated Book of Law for bosses, and Illuminated Book of Wisdom + Law for Black Stone Dragon due to how much he can possibly move around during the fight. All 3 books are not necessary, but they fufill the situational niches.
- (Super) Saradomin Brews/Stackable Food + Divine Spirit Shield for emergencies.
Equipment Perks
All perks follow the Ancient Invention Handbook (Topic 3435) with the exception of Sirenic Chaps.
Dragon Slayer perk + Genocidal on Dragons task. Gizmo #2 is largely preference. Before taking on ED2, grab a task from Laniakea, and get your amount remaining down to a low number.
That's it for all of our gear preset and setup. Now, let's go in!
Area I: Dungeon Entrance
SpoilerSince the Dragonkin Laboratory is one floor, there is only one map for the entirety of it. To avoid confusion, I'll break the map down into fragments. We'll start with the first area up to Astellarn.
Refer to these fragments for any miscellaneous information regarding the dungeon.
When you first step in, this is the first room you'll see. You'll have to deal with all of the laboratory slimes to open the gate. These slimes will create more smaller versions of themselves the longer they hit you. To avoid multiplication, you can kite the slimes around and only have to deal with the initial 6 slimes. Otherwise, follow the arrows to gain aggro of all of them, and aoe them down at the gate with your mage setup. Proceed down the stairs, and equip your ranged gear.
Start by either going down the right staircase to kill the single Red Dragon, or kill the 2x Reds in front of the gate. Either way, all 3 need to die to continue past the barrier. Follow the arrows path to properly pull the mobs into aoe stacks. You can use either SGB spec or use magic attacks, although SGB is generally a stronger approach. When all 7 dragons in this picture die, the gate will open. Proceed onto the bridge with your magic gear equipped.
Note: Lava Spiders spawn in the room to your left and commonly aggro you if they walk outside of it. They're annoying to deal with, so try to avoid them if you can.7x Magma Golems occupy this bridge, and they all attack with melee. These can become overwhelming very quickly if you're not praying Melee, or healing it all back with Soulsplit and Blood Barrage. Their attacks are not synced up with their walking animations, so they can still hit you even if they're nowhere near you. Follow the arrow path to properly collect the golems into one pile to aoe down. Proceed into the next room.
In the next room is a cluster of slimes, and 1 Celestial Dragon to take care of. You do not need to kill the slimes, only the dragon. However, doing this will result in the slimes following you into the next area, and possibly multiplying into a stack that could instantly kill you. If that's alright with you, take the left arrow path. Take the right path to aoe the slimes down, then take care of the dragon to continue into the next room.
This room consists of purely Celestial Dragons, all of which do not have to die in order to continue into the first boss encounter. Start by following the arrow path to pull the outlier of the 3 dragons in front of you. Stack them up and SGB spec them all. Aim for the one in the center of the cluster of them. If SGB is not an option, do the same pull, and barrage them down. The next dragon in front of the gate is the only one you have to kill to open the 2nd gate. Same applies for the 3rd gate into Astellarn's arena. Be sure to activate the chest at the doorway, and prepare for the first boss encounter.
Astellarn
Astellarn will remain in the same spot she is in the entire fight, and is not hostile until you attack her. She attacks with magic dragon breath attacks if you are a distance away from her. These attacks do not miss, prayer or not. You can also get melee distance and she will only do slight melee damage to you.
Pulsar
Her first special is the pulsar. This is a single entity that will spawn anywhere in the arena. It does damage to you with cannonball hitsplats. It will hit you from anywhere in the arena, and will never miss or stop attacking you until its dead. It's recommend you either deal with it first, or destroy it when Astellarn begins her next special, Celestial Rain.
Celestial Rain
Celestial Rain will begin when Astellarn reaches 200,000 HP (20,000 in 718 numbers) , and Astellarn will gain immense damage reduction. Celestial Rain does typeless damage that ramps up the longer you stand in it, so you should avoid it at all costs. The arena has been divided into four quadrants to show where the rain may move to, and where you will be on either side of it to avoid it. After a while, Astellarn will select a random player in the instance (only you if solo) to become the wormhole anchor point.
Wormhole/Neutron Star Lure
When you are chosen, a secondary hp bar will appear overhead, and at the end of it, a wormhole will spawn underneath you. This will deal heavy typeless damage if you're standing in the center, marked with an X, but light typeless damage if on the outside of the center. A neutron star will spawn, and will be drawn to you. It will follow you until either the wormhole consumes it, or it detonates on you, which will deal up to 550+ typeless damage to you. If this happens, its recommend to teleport out and start over. Guide the neutron star into the wormhole by pathing ahead of it. If done correctly, the neutron star will be engulfed by the wormhole, and the wormhole will turn white.
When it is in this state, you are safe to stand back inside of it, and should definitely do so. This is the only time you will do full damage to Astellarn. You have to remain inside the wormhole, or damage will be reduced again. Do as much damage as you can before the next wormhole spawns. Once Astellarn dies, all special attacks on field will cancel, and the gate will open to your right. Proceed into the next area, killing the first 2 Celestials in front of you to open the following gate.
Area II: 'Kalist Kirah'
SpoilerHere is the primary area you will explore on the way up to Verak Lith, the 2nd boss encounter. There are over 2 Elite Dungeon chests in this area alone, so you'll have plenty of checkpoints. After you kill the 2 Celestials post Astellarn, proceed down the small staircase into the next area.
Up ahead, there is a large cluster of Lava Spiders, and 2 Lava Strykewyrms. Only the Wyrms need to die to open the gate. Follow the arrows, while trying to not aggro every spider in the process, as they start to hurt a lot if all of them are hitting you. Use your SGB spec on the left wyrm to hit the one on the right as well. Magic attacks also work in this regard if you don't have an SGB. Proceed through the gate after the wyrms die, still following the arrow path. If you wish to kill the spiders, get to the end of the arrow path so they will stack up, and aoe them down. Continue forward down the path.
Follow the arrow path until you reach the 2nd set of Black Dragons at the gate. Only these 2 need to die to open the gate, and you can hit the one marked with aoe to also hit the one behind him, as dragons hitboxes extend on their Southeastern square/tile. They will not always be so close to each other, and you won't be able to pull the one closest to the gate. He will simply walk in place trying to reach you. If this happens, either hit him with the aoe, or take them on as single targets. SGB spec or barrage them and proceed forward past the gate.
There will be 7x Black Dragons in the room ahead, but once again only 2 have to die. They are always the ones closest to the gate, which in this instance, were the ones inside the rectangle. You can stand at the gate itself to bring all the dragons onto one stack, or you can simply kill just those two and continue up the path. After the gate is open, proceed up the slope to where the 4x Lava Strykewyrms and 2x Black Dragons are. Only the 2nd set of Strykes have to die, as well as the dragons. Follow the arrow path to pull them all near each other, and SGB spec the left wyrm to hit every target. You can use Barrage here too, and its just as effective.
This is what you should see before hitting the left wyrm. Once dead, move forward past the gate.
4x Black dragons are in this section, but only the one at the gate must die to continue forward. Follow the arrow path and prepare for the 2nd boss encounter of the dungeon, Verak Lith. Activate the 'Molten Ruins' Chest and proceed up the rock into the arena.
Verak Lith
Verak will be in the center of the arena in-between 3 piles of eggs, non hostile until provoked. Begin the fight with an auto attack into an SGB spec. Verak attacks with Magic and Melee attacks if in melee distance. Both are very accurate and can hit up to 350+ every hit. It is recommend you either flick Soulsplit between mage pray, or use your food to sustain yourself if using ECB EoF spec. Verak will attack you with magic or melee attacks 4 times before he uses his first special attack.
Stone Spires
For the first special attack, Verak will slam his tail against the ground, and a stone spire will come out from underground (+1 spire per player), dealing about 150+ typeless damage to every player in the instance. As long as this spire is active, Verak Lith will be invulnerable to damage. Kill them as fast as you can. If you have dual wield ranged weapons, now is the time to get them out to quickly take care of the spire. Once the spire is gone, get back on Verak Lith and take 4 more attacks into his next special.
Note: Verak's attack rotation continues immediately after the spire comes out, so the first auto attack he does to you after the spire is out is the 1st of the 4 before special.
Poison/Ice/Shock Ricochet
Verak Lith will fire a projectile at you, which will ricochet toward an area indicated by a flashing yellow arrow. If you don't absorb it by standing on the arrow, you will take a typeless damage hit up to 250 damage (+1 hit for every player in instance if not absorbed). If you do absorb it, you will be put on a timer, and will need to cleanse it from you by going to its counterpart. The picture above shows where to go if absorbed. If this timer runs out and you have not cleansed, you will be hit for up to 500+ typeless damage. Generally speaking, its a better idea to just ignore the ricochet entirely and keep doing damage to Verak. He will do 4 auto attacks once again into his next special.
Black Dragon Dive Bomb
Verak Lith will stop attacking briefly to allow a dragon above to dive bomb you. The dragon flies by fast, and hits anything in the spot it flew past for some typeless damage. This one is pretty basic, just step to the side once and keep damaging Verak. After the dragon has flown by, Verak will return to his attack rotation, doing one more Stone Spires special.
Flame Vortices
Verak Lith will summon embers around a selected player, and they have a limited amount of time to get away from the area before they form into Flame Vortices. These hurt a lot, hit for typeless damage, hit every tick, and should be avoided at all costs. Quickly reposition away from the vortices, and hop back on Verak Lith. His attack rotation will reset after this special.
Continue to do damage until Verak Lith is dead. Once he is, the giant barrier at the 'Kalist Kiket Fia' teleport will go down, and the teleport will available at the dungeon's chests. Open your teleport menu (Ctrl+T), and go to the Dragonkin Laboratory teleport. Re-enter your instance, select the teleport option on the chest in front of you, and select the 4th option.
Area III: 'Kalist Kiket Fia'
SpoilerThe last and smallest part of the dungeon. Once at the chest, proceed past the bridge towards the gemstone dragons.
Past the bridge are 2x Onyx Dragons immediately, 3x Dragonstone Dragons, and an additional Onyx Dragon at the gate. Only those circled have to die to open the gate. Follow the arrow path to route backwards to get all of the necessary dragons stacked up and ready for aoe. Use SGB spec or Barrage as per usual. Proceed up the stairs after the gate is down.
Additionally, you can take this route, where you aggro the 3x Dragonstones, and the 1x Onyx at the gate, tuck into the right corner, and SGB/Barrage spec whatever is on the X marked area.
Directly ahead to the left are 2x Dragonstone Dragons. Follow the path arrows to stack them up and kill them both. Proceed forward past the gate. On your way to the next gate will be 2x Hydrix Dragons. They are not required to die to move forward- however, their special attack will drain your entire special attack bar if it lands. If you keep them alive, be wary of their attacks.
4x Dragonstones to take care of, 2x at each gate. Follow the path arrows to route them onto a stack, and use your SGB spec or Barrage. Once both gates are down, activate the 'Kalist Kiket Kreath' chest, and toggle the auto loot function off for the final encounter boss encounter of the dungeon- The Black Stone Dragon.
Black Stone Dragon
Upon entry, you will see the Black Stone Dragon in the center of a giant circle inscription. She is non hostile until provoked. Start the fight by attacking her- I like to ECB Ammy > Auto Attack > SGB Spec as an entry rotation. Black Stone Dragon attacks with Melee, Ranged and Magic. with her magic attacks being extremely accurate and always doing a sizable amount of damage. She will also fire out a gemstone dragon spike occasionally, which after a short delay, will hit under wherever you were. If you're hit by this, it'll do at least a 3rd of your hp in typeless damage. DPS Black Stone Dragon until she reaches 520,000 HP (52,000 in 718) and says "Arrrgh! It comes."
Black Hands
Black Stone Dragon will place herself in the center inscription, and will be immune to damage. Around all 4 corners of the inscription are Black Hands that must all die in order to continue the fight. They will attack using magic, and will do so twice before they use their special attack.
From underneath the hand, a double file line of hands will advance toward you quickly. You will take up to 200+ typeless damage rapidly if you don't move. Maintaining distance from the hands will give you more time to evade the line of hands. Use your dual wield crossbows to deal with the Black Hands faster. After all 4 are dead, you will be able to attack Black Stone Dragon again. She will auto attack you 3 times before her next special attack.
Shadow Bomb
Black Stone Dragon will cancel her attacks, and will fling a bomb in a direction. This can go anywhere around you and her, near or far, and has a large detonation radius. The explosion does up to 350+ typeless damage to you. If you are in the epicenter of the explosion, you will be hit twice instead. Swap to your Spirit Shield to reduce the damage of this attack, as it can very easily result in a K-O if in the epicenter, combined with her melee auto attacks. The bomb may launch itself away from and far from you. In the case of this happening, keep doing damage to her normally until the next phase begins.
Pogo Phase
Famously named 'Pogo Phase' due to her 'bouncing' around the arena.
Black Stone Dragon will gain an immense amount of damage reduction and will appear next to you, with a fireball coming from nearby. This fireball will occur every time she lands next to you, and it will deal rapid 350+ typeless damage hits if you do not evade its path. Black Stone Dragon will bounce around until she says "SHOW ME THE LIGHT!!!" After a small delay, you can do full damage to her again, and she will continue her original attack pattern post Black Hands. Keep doing damage until she finally dies. A long dying animation will play out, and you will have finished the dungeon. Proceed to loot the drop, and hope that it doubles your energies with the chest toggle!
Congratulations on your completion of the Dragonkin Laboratory!
Conclusion
That's the end of that, hope you guys liked it! I tried to give all special attacks their own little subsections and subtitles in this one, and I think it went well.
ED2 is an enjoyable dungeon to run, but quite a grind with the amount of Draconic Energy you can get (minimum of 1 only!) Regardless, it's faster than all the other elite dungeons, with some OK additional resource rewards (Remember ECB Parts from ED2 Bosses?)
The next and final dungeon to cover is ED3, The Shadow Reef!
Definitely my favorite one of them all, with the most combined runs of all of the 3. I'll try to get the next guide out soon as I can.
Until then, good luck and have fun!
- ster
Final Collection Log & Pet Showcase
Bisdi
-
2
-
1
-
2
-
1
-
Foreword
Hi guys, it's Ster. If you guys didn't know I recently achieved the first completion of all Elite Dungeon collection logs, and with that, I wanted to show everybody how awesome this content can be, and show you how to do it just like I do, all the techniques and routing included. The plan is to make this guide as accessible to as many players as possible, but will be mostly coming from the solo perspective. This doesn't mean you shouldn't use this in teams, though! Without further adieu, let's get to the gear setup.
Presets and EquipmentSpoilerIn ED1, you're going to want to run Mage and Ranged equipment at the same time. I recommend if you go Solo, you take your best possible loadout for both said combat styles.
Here's what I personally use
Footnotes: Equipment- Wand and Rebounder/Lantern are pretty amazing in ED1. So many of the enemies stun you that having complete immunity to it will save your life and time often!
- Max/Completionist/Skill Cape for hybrid stats among mage and ranged loadout switches.
- Illuminated Book of Chaos for Area of Effect clearing of mobs. Bring another Illuminated book with you for bosses (see below at Inventory)
- Cinderbanes + Weapon Poison to do a little extra damage to whatever can be poisoned + maintain decent hybrid stats. Neither are necessary, just use your best!
- Essence of Finality (or) with Eldritch Crossbow special attack; combo with the Ring of Death to passively restore special attack as I route the dungeon. ECB spec is absolutely not necessary, it is just what I use. Feel free to store Guthix Staff/Magic Shortbow/Zuriels Staff in yours if ECB is not an option.
- Ruby Bakriminel Bolts (e) in the quiver slot, with another set of ammo in the inventory.
Footnotes: Inventory
- The best (combo) Overload you can use. I use Elder Overload Salve, but you can use as low as Holy Overloads if you wish to.
- Enhanced Excalibur to heal passively in the heat of a fight.
- Asylum's surgeon ring for T85 Hybrid stats, and the special attack reserve passive. Use this at bosses. Hazelmere's signet ring/Luck of the Dwarves can be worn while clearing to double your relics often.
- Two ammo swaps; Black Stone Arrows to reduce defense of bosses by a percentage every hit (up to 15% armor reduction) and Onyx Bakriminel Bolts (e) to heal and still do 25% more damage on activation.
- The best ranged weapons you can use, preferably Dual Wield Crossbow + Repriser with a bow to spec (SGB or MSB Spec)
- Your best ranged armor to swap to for bosses in particular. Will go over chosen/recommended perks for weapons and armor below.
- Sealed Rune Pouch with runes for Ice and Blood Barrage.
- Illuminated Book of Law for single target high DPS on activation. Every boss in the dungeon is either positioned on one tile and doesn't move, or you have full control of their movement- so use this book when you're not clearing mobs!
- XP Capacitor 5000 (charging) to passively level during runs. Not necessary at all, but nice to do in the background
- (Super) Saradomin Brew Flasks/Stackable Food like Blue Blubber Jellies. Adrenaline potion flask to restore special attack when RoD can't.
- Divine Spirit Shield if things get messy and you need a plan B.
Equipment Perks
For your Ranged & Mage Top. Crackling 3/Ultimatums 3 and Biting 3 can be substituted if ancient invention is not a possiblity.
Ranged Legs combo; Invigorating does nothing, but Energising 4 is great. Can be substituted with Mobile/Reflexes. Crystal Shield 4 Enhanced Devoted 4 to effectively half the damage you take temporarily.
Mage Robe Bottoms. These are both pretty much free space perks on mage gear. I like Scav 4 for getting extra invention components often from killing mobs. Undead Slayer for ED3 Niche.
Weapon perks remain standard to the Ancient Invention Handbook (Topic 3435)
Now that we're all sorted, let's start a full clear!
Floor I: Temple Entrance
SpoilerWe will use this map for reference.
You will start where 'to Aminishi' is. Go down the stairs and get ready to fight. You can take either the left or the right. I typically pick right, but it's preference.
Pull all the enemies by following the arrows. AoE them down and move forward in a straight line east until you reach the end of the pool in the center of the room. Proceed north until you see the 8x Sotaponnas.
These will all sprint toward you, so face against the wall, pray melee (or ss) and AoE their stack down. Go into the entrance to your left.
Get all the mages' attention, and follow the arrows to make them stack up. Proceed into the door down the stairs after you've dealt with them.
Note: The miniboss before this room will follow you into here.
Floor II: The Sanctum
SpoilerOnce again we will use RS Wiki's map as reference.
You will begin this part at 'to Floor 1'. Walk down the stairs and attack the mage in the center of the five in the hall.
Ideally, the 3 in the middle will line up, allowing for an easy blood barrage of all of them. The 2 on the far left and right can be dealt with as single targets.
Either left or right path, both can be dealt with the same way. Follow the arrows, and the mages will stack themselves onto one tile. Move forward to either side of choice, while praying mage against the Arhats ahead.
On the 2nd to last platform before Sanctum Guardian, there is an Elite Dungeon Chest. Get close to it to activate it for a quick teleport if you have to leave/die. Pick either left or right path to take, and kill the 3 mages in front of the barrier on either side.
Sanctum Guardian FightSwap to your Ranged gear and get ready for a fight.
Start the fight inside the left outline, and watch the Guardian's attacks. He will seemingly splash out the water at you twice, which will hit you a decent amount for melee damage, and he will begin his spinning water jet special after the 2nd splash. He will always start by firing it in the center, and rotating counterclockwise around until he faces his original position. Get into the outline on the right before he fully gets around to you. Note that he will hit you for the first part of the attack, and it can hit up to 500+ typeless damage, so have a decent amount of hitpoints before it happens.
After the water jet is over, he will fire a cloud of smoke at you, which will drop underneath your feet after a secondary HP bar fills above you. He will also release a melee attack beforehand. The smoke hurts enough to the point where you should not stand in it for very long. Keep dealing damage until he's dead. Proceed into the giant door behind him.
Floor III: Between The Sanctum and Throne Room
SpoilerAs per usual, here's a map for reference. You will start at 'to Floor 2'. Keep in mind there is NO BANK CHEST on this entire floor. Take precautions and play safe if you have to, it's a long run back. Proceed down the left staircase.
Follow the arrows and grab the attention of all of the mobs on path. Step under one of the Cloaked Zealots to reposition him. Clear like usual until the barrier goes down, and proceed to the left beyond it.
Up ahead are 6 Death Lotus Rogues, and 3 Zealots. It is crucial that you pray Ranged while the Rogues are alive, they hit very accurately and for a lot of damage without it, and you could easily die from it. Only the 2nd set of Rogues and the Zealots are required to die to move forward past the barrier. Go down the stairs, and you will find yourself in a room that appears to be a giant circle. Take the left path around until you reach the Zealot at the barrier. It is recommend you keep ranged pray on while running the circle. Kill the zealot to proceed forward.Follow the arrows and deal with the 4x Zealots before the barrier. Proceed up the small staircase.
Follow the arrows accordingly, and attack the highlighted zealot up the stairs (The center of the 5 in a line) to grab all of them at once. Route backwards as the arrow says to stack them up for aoe. After they die, the door will open. The zealots downstairs will aggro you, but they are not necessary to move forward. Pray Magic if its getting too hectic. Proceed through the doorway.
Floor IV: Throne Room
SpoilerThe 2nd to last floor. Once again, the map layout for reference. You will start at 'to Floor 3'.
Start off by killing the 2 mages in front of you to open the barrier. Follow the arrows, and aggro every mob on the path to the next barrier. Stack them up, aoe them down, and proceed down the small staircase beyond the barrier.
Probably the most dangerous room in the entire dungeon. To your immediate left and right behind the columns are Death Lotus Rogues, 1 on each side. Whatever path you decide to take, deal with the Rogues first. The center cluster of enemies is mostly consists of melee targets, with a few healer mages. Prioritize the healers, pull them backward, or keep moving with the arrows. The left path has 3 Meleers and 2 Healer Mages crammed into a U Shape. Aoe them down, and double back when you reach the zealots to pull them back and stack to kill. The right path is less dangerous, but you're further away from the one bank chest for 2 floors. Choose wisely! Proceed down the left or right staircase, activate the chest, and prepare for the Masuta encounter.
Masuta The Ascended
Start the fight by attacking him at the top of the staircase. He will sprint toward you, and stick to you like glue. After about 4 auto attacks, he will do a special attack.
One of them being him spinning his warspear around him toward you, dealing typeless damage that hits harder the longer he hits you with it. Back up from him, and keep dealing damage.
He can also summon a clone of himself, which will simply auto attack you, but as long as you're in range of it, it'll effectively be 2 of him hitting you at once.
The next special he'll do is summoning a thrashing tide of water. You'll see tendrils of water gather around you and after a certain amount of time, they'll lash out, creating a wave that can hit up to 500+ magic damage every 2 ticks. However, wherever the wave spawned is where it will stay. Be sure to move away from it on time.
At around 50% hp, Masuta will begin to float in the air, and will have damage reduction so high that attacking him is pointless outside of Soulsplit healing. Throughout the duration of him floating, he'll summon thrashing waters, which are mobile mage mobs that have a very long attack range. Since they're all you can really do in this timegated portion of the fight, kill a few if not all of them. He will land and begin fighting you on the ground after he says "These waters will choke you where you stand!"
After a few hits, he will once again summon a thrashing wave, but this one has no real warning. It'll comes out from him fast, and it hurts. It's a good idea to mage pray the initial hits from it, and then get back on Masuta until he's dead. Proceed down the staircase that just opened after he dies.
Floor V: The Azure Prison
SpoilerThe final floor and last encounter of the dungeon.
You will start at 'to Floor 4'. Proceed down the staircase and take either left or right path.
In the center platform are 6 Defence Pylons. You will only need to destroy the 3 located inside the triangle in order to open the right path barrier into the final encounter of the dungeon. Activate the chest, and proceed down the right path.
Seiryu, The Azure Serpent
Seiryu will always attack in the same pattern. He will begin with a bouncing water projectile, which will fling out of him, bounce off the floor, and back to you dealing moderate magic damage.
Afterwards, he will have shadow energy fling out of him and land on the ground. You will see a flashing arrow over the shadow pool. Do not go onto the arrow, as after the pool shrinks, a line of shadow enigma hands will advance towards wherever you were at the end of the attack. If you were standing directly on top, you will take damage. These hands do up to 200 typeless damage every tick, but have a narrow hitbox.
For his final special in rotation, he will rear back, and cover the arena with his breath. This attack deals heavy magic damage, up to 650+, but it can miss and should be taken advantage of for Dharok's Memento Relic users. After this attack, the special rotation repeats.
At around 60% HP, Seiryu will keel over in exhaustion, and you will be allowed to climb up on either side of his head (click between the gap from the arena platform and the crystal platform)
This is by all means a DPS check phase. All crystals will spawn around half hp, giving you just enough time to finish the fight by yourself.
On the circular etching is a shadow portal, where at 40% of the bar, and about 80% of the bar, 2 shadow enigmas (+2 for each player in the instance) will advance toward Seiryu. If they reach him, they will Uber Heal the remaining crystals. You have the option of trying to DPS race them, or hopping back down to deal with them. Ideally, you finish this before the 2nd set of engimas reach him. If not, Seiryu will awaken, and be at full hp again. If this occurs, simply get him to 60% hp again, and finish off the remaining crystal(s).
Congratulations on your completion of the Temple Of Aminishi!
Conclusion
Wow, that was a lot of info, wasn't it? It's a lot easier than it looks, though. I recommend running this dungeon with a group of 3 due to Seiryu's scale drop not scaling to additional members, and for faster clears. Understand that I do not expect everyone to have my gear setup- just bring your best and do your best.
I hope this guide helped you understand the dungeon more, and that you'll get your Elite Sirenic sets quickly cause of it!
Next guide is the Dragonkin Laboratory (soontm)- until then, good luck and have fun!
- ster
Final Collection Log & Pet Showcase
(198 Sanctum Guardians, and 159 Masutas)
Kuroryu
-
6
-
1
-
9
-
1
-
On 7/31/2021 at 5:57 PM, sterling said:
IGN: Sterling G
IP1:Telos The Warden
IP2:The Final Boss
IM6:Completionist Cape
IM10:Prestige Master 25
IM13:Musician
D3:Verified Discord Account
-------------------------------
IP1:Telos The Warden
IP2:The Final Boss
IM6:Completionist Cape
IM10:Prestige Master 25
IM13:Musician
D3:Verified Discord Account/Nhs
Could you add IP5 as well, please?
/Nhs
-
1
-
-
zombie walk bis again ty
-
 1
1
-
-
let me hold weps while zombie walking again
+1-
 1
1
-
-
22 hours ago, Rn Nick said:
and just in your defense. this just happened like 2 minutes ago
this is legit the reason the eco is fucked.
You should ping me the next time you decide to make me (and 10hp) look bad.
Yes, the SGB story is true. They immediately rebounded back up to 1.4B the following day. but due to the incredibly high supply and less demand because of said supply, they went to 800m extremely temporarily.
No, I'm not actively encouraging him to 'destroy' a market- and even if I was, that is what player controlled economy can lead to.
Back to the main point, not sure why posting an out- of -context satirical picture gives your post any sense of legitimacy. These are just words with nothing backing it up.19 hours ago, Rn Nick said:
Why is this even included? This act of generosity could've been naturally done but you insisted on screenshotting this interaction and showing it to the public
19 hours ago, Rn Nick said:Look. right after i made this post i came across this guy at home who made less than 50m from skilling in a day. he said most of that cash came from selling vote books. you don't think that's a problem? everyone is ignoring the facts and turning the attention to the fact a gambling suggestion was made, which had nothing to do with the problem made under this thread, so shouldn't have been included in the thread, but yeah.
No, I don't think it's a problem because he HAS SO MANY more options after that, and just isn't being told. A lot of the gp making methods in this game are from skilling itself. Did you suggest any other things to him to try? There is gp to be made everywhere in this game one way or another.
-
4
-
1
-
-
This is great! Hopefully we get more fill ins in our teams with this!
-
wow amazing guide very cool thank u
-
Welcome to The Stage Of History.
-
oh god oh jeez oh man dude
-
IGN: Sterling G
IP1:Telos The Warden
IP2:The Final Boss
IM6:Completionist Cape
IM10:Prestige Master 25
IM13:Musician
D3:Verified Discord Account
-------------------------------
IP1:Telos The Warden
IP2:The Final Boss
IM6:Completionist Cape
IM10:Prestige Master 25
IM13:Musician
D3:Verified Discord Account/Nhs
-
1
-
-
all my homies got beef with h.a.m.
-
on the dead homies
-
1
-
-
this thread belongs to zanik now
-
You know who I am.
IGN is Sterling G/Sterling and Sterling is also is my real name.
I come from Indiana and with not a lot to do here, I spend a bunch of time on here.
Majoring in Structural Welding.
PvM Prodigy with horrible pet luck.
Ask me anything if you're interested in knowing more!-
2
-
-
19 minutes ago, Yggdrasil said:
arcadiez what the fuck is this
art, obviously
-
45 minutes ago, Winter Revel said:
think regular mode should probably be discontinued/retired. It allows for too fast of progression to endgame content, and people miss tons of the midgame content which you've spent the time to add as well. It's also kind of a noob trap, as the extra drop rate later on is extremely valuable. Regular mode is mostly for the prestige-gameplay now, although it wasn't previously. Regular mode you can max pretty quickly, even with SOF. Novice mode would get ppl addicted better
Also it's weird that you can just make a classic account, and spoon-feed resources that you've farmed on a regular mode account to it for faster progression. I think novice mode should probably be the standard. It's in a pretty balanced spot. For players that are regular currently (myself included), could just leave them. All they have left to do is prestige. Over. and. Over. Perhaps just give novices an option to have exp at x200 up to level 50 in a skill, like you had exp go to x10 post 99 back in the day.
Do you have any idea what would happen current Regulars if they get discontinued? Would we just keep our accounts as is? Or would our accounts get knocked down to Novice xp rates?
-
2
-
-
26 minutes ago, sterling said:
4. Find something out about the Grand Exchange. This is extremely complicated, but this server has many ironmen and not very many normal players that trade and cycle gp around, and many items are very limited due to the lack of people actually going for drops.
@Fulltimewife gave me the addition to this of adding an inverse to the GE system, where as of now, items can be bought at an unlimited quantity; Allow items to be sold to the Grand Exchange at maybe 80% value infinitely as well. The GE deletes the item, so there is no item bloat and it gets sunk, and gp gets injected into the economy. You'll always lose money rather than selling it to a real player, and to get items, you have to PvM for them, and that's okay. Player-to-player trades could still occur and bartering could still function in that regard.
-
5
-
1
-
-
4 minutes ago, Yggdrasil said:
Add custom elements to the server, rather than custom items and bosses. For example, adding skilling hotspots that rotate by the hour which increase experience gained for specific skill-sets (gatherers, artisans, combat, etc)
Absolutely! Make us want to do specific activities and not pigeonhole everybody into doing one thing.
5 minutes ago, Yggdrasil said:Add boss highlights that temporarily increase the drop-rate of rare drops on specific bosses; adding exceptions for bosses such as Telos, Arraxor and Vorago, all of which should not be affected.
Possibly allow the spotlights to increase pet droprate too, if thresholds are not an option in the future.
6 minutes ago, Yggdrasil said:When updating the server, do so on a weekly basis where changes you propose (such as damage alterations to bosses) all come at once rather than being scattered around across one week. Provide the update log a day before the update comes out, giving the community some much needed transparency.
100% yes. We adore the transparency of updates, and while looking for some ninja updates can be fun on our own, a lot of them are very detrimental if not mentioned beforehand.
5 minutes ago, Iron Tyrone said:Announcements:
Let players show off their achievements, we already have announcements for Maxing, Comping, Achievement Diaries etc; give us Collection Log completion announcements. If somebody has been grinding KBD for 3000 kills to get the pet and complete the log, let them show it off with that announcement. Sure it's only there for a little bit of time, but people enjoy recognition for their achievements.I love this a lot, thank you for mentioning it. As a collection log completer, I would love the addition of Feats like from RS3 to show a log has been fully completed.
8 minutes ago, Yggdrasil said:Client-side improvements (many of which I know you're worknig on) that helps to streamline the new player experience by making it smoother.
This would be fantastic coming from somebody that strictly plays on Experimental client and often memory leaks if I go through too many loading gates (I.E. Elite dungeons)
-
5
-
1
-
-
50 minutes ago, Medley said:
We Appreciate the reach out , lets throw some ideals out.
id love to see Gambling content - pvp content , pvp stores or good rewards, a global lottery system maybe,
This is a much better look on it than simply Flower Poker & Staking. Good shout. Don't know how it could play out, but your heart is in the right place.
-
1
-
-
Thank you for being humble about this. It shows your growth as a developer and it shows you can trust your players to help you out.
I'll be asking my clan about our complaints and issues, but I'll fire off some suggestions for you.-
Adjust Dual Wielding; It is outclassed almost no matter what by 2h and is completely neglected.
-
Adjust the invention perk weighting. Easier said than done and I know you're wanting somebody to bring you a more refined system for it. Ancient invention is one of the biggest gp sinks in the endgame due to the extremely rare perk combinations. You should also consider reworking some perks/adding custom additions to them (Caroming is custom anyway)
-
Introduce further 120 skills. Herblore and Farming as 120 skills would set the path for a lot of other issues (I.E. Extreme Invention Potions for ancient invention)
-
Find something out about the Grand Exchange. This is extremely complicated, but this server has many ironmen and not very many normal players that trade and cycle gp around, and many items are very limited due to the lack of people actually going for drops.
-
Most PvMers are actually bored cause of one thing; Lack of difficulty. There is no challenge in this game and as a big PvMer myself, I absolutely welcome it. Leading back to the Grand Exchange issue, a lot of these high level drops CANNOT be sold on the Grand Exchange because nobody can sell them due to extreme undercut or lack of gp circulation. Make content harder! It's not a bad thing. Make people feel like their gear is progressing and they're actually getting better for practicing the content. You can do just about anything in this game in T80 gear if not less. Accessibility is good, but too much is a curse.
-
Host community events perhaps? Not just like, The Beach, but maybe weekly PvM events, or skilling competitions. Get your community involved and excited to not just compete with eachother, but come together as a community and enjoy eachother. For PvM events, maybe try handicaps and buffs (only use these parts of gear, but allow something very strong inbetween.)
-
Work with your PvP community and fix the problems they all have with it. Give incentive to go into the Wilderness, face off against players, and make it rewarding. Or even add PvP based modes, like Last Man Standing, or perhaps a PvP only world where everywhere is dangerous.
-
Provide more raw gp gain. I know you're probably sick of hearing this but the economy is in shambles because of the gp nerf. Allow people to be rewarded for doing their favorite bosses/slayer content WITHOUT being on task or on reaper assignment.
An addition: rework the slayer and reaper reward shops. Make tasks longer, allow preferred tasks, and add additional rewards to the reaper shop.
-
Fix some collection logs; I have the most Vorago kc in the game and I cannot complete my collection log still (add hardmode vorago cause its too easy anyway) Perhaps add Golden Reaper? And maybe add pet thresholds to encourage people to grind for their pets but rewarding them for doing it anyway.
-
Add additional Achievement Diaries. I know a lot of people would love to see Tirannwn Quiver, Wilderness Sword, Desert Amulet, Daemonheim Aura, and Ardougne Cloak.
-
Finish the missing Arch relics and mysteries. A ton of people try to get some relics just to be told they're not coded or don't work and that kills motivation for a lot of content.
-
Work on Anachronia more! Introduce Big Game Hunter, and flush it out a little bit more. It largely feels incomplete and the only incentive to go is for Grenwalls. Also add Orthen when you get the chance (we know you're working on it)
-
Add somebody to your dev team. We know you don't want to, and we know why. But you have a lot going on in your personal life and you need that assistance, you NEED that backup support. Find somebody you know you can trust, and work together with them to help your game grow. Also! Ask your community more things like you're doing now. Ask us in game even.
- Allow more beta gameplay. I was able to test the ED3 patch and I had a ton of fun doing it and giving you some notable feedback on it all, and it's good to have an early opinion from early access so you know what to adjust and fix. Allow your players and your own staff team access to give you early feedback before throwing anything into live. We want to help, you know?
- Add scaling to Elite Dungeons. Give people incentive to solo the content for higher droprates.
ED1: Fix the Ancient Scale drop for Seiryu, it's STILL severely underwhelming.
ED2: Make the Elite Dungeon Banking ability drop from Black Stone Dragon not as rare, it's the equivalent of an ECB part before ED3 patch.
ED3: Allow some use of Black Stone Hearts, and make Black Stone Arrows work. Maybe create custom passives from them, or a sigil like item like Excalibur's effect.
It's a lot to take in, but this is for the better of your server and for the better of your community and loyal players. I love this game a lot, despite only being here for half a year, and I want it to be better. We wanna help, Sandstorm, and I'm glad you're reaching out.-
10
-
6
-
Adjust Dual Wielding; It is outclassed almost no matter what by 2h and is completely neglected.
-
In RS3, Hydrix and Ascendri share the same passive ability called Deathmark.
When activated, it grants you 10% adrenaline immediately and allows you to gain 1% adrenaline per shot afterwards as the buff continues.
On here however, it only does the 2nd part. I would love to see the full inclusion of Deathmark included in the future if possible!
-
Probably the worst grind I've decided to do. Check out the progress!
I got the title on RS3 so figured why not do it here?
-
5
-
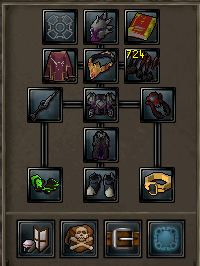
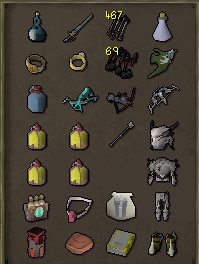
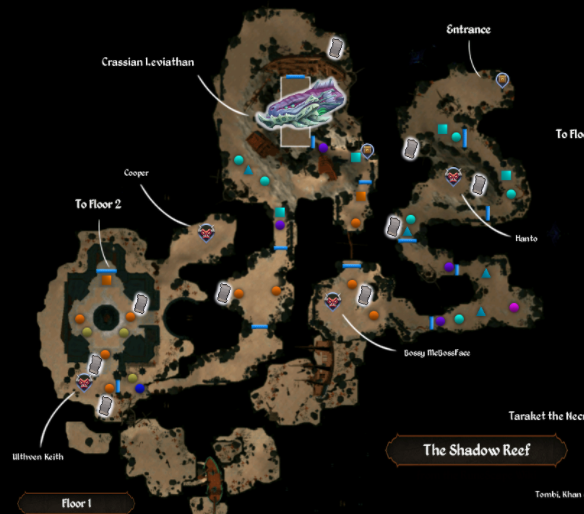

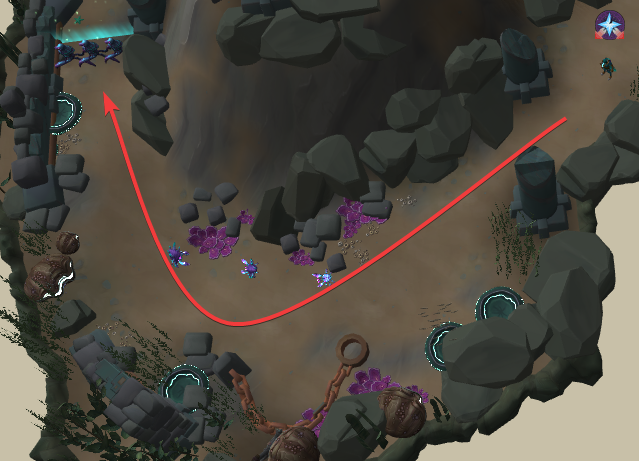
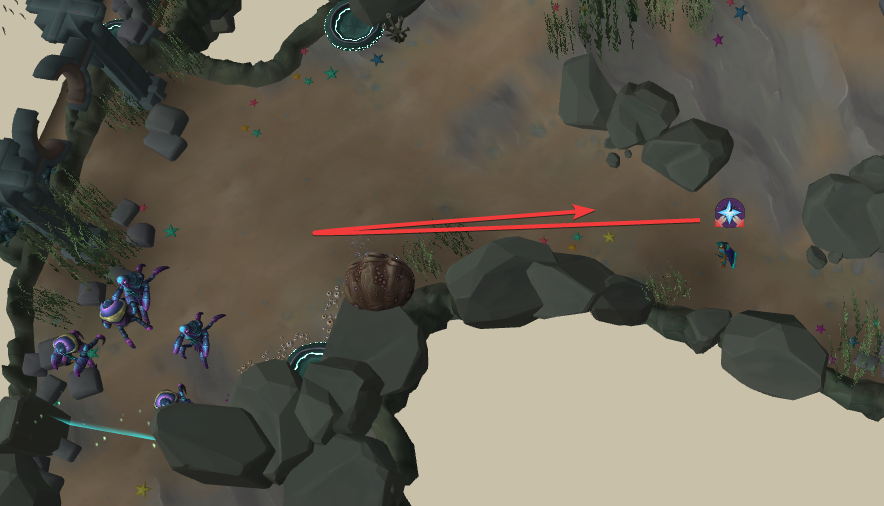

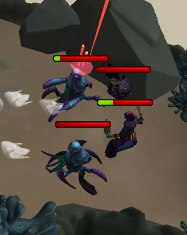
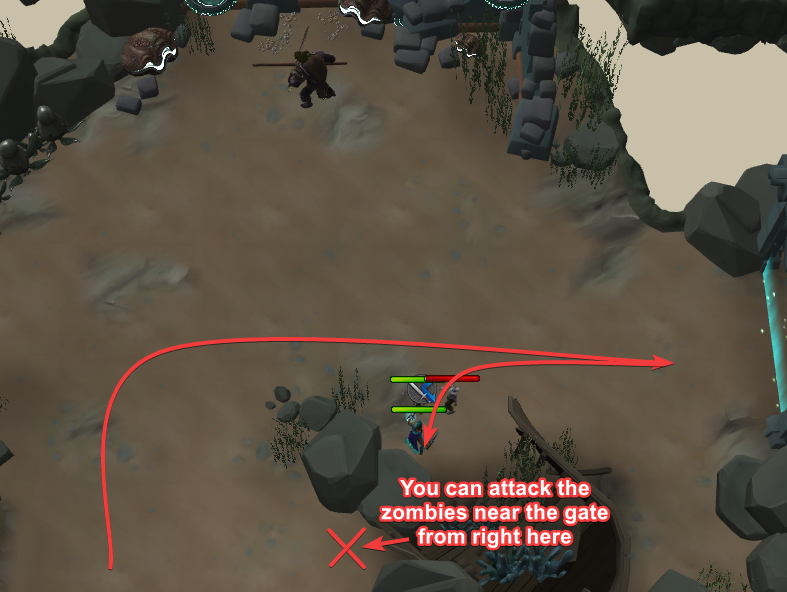
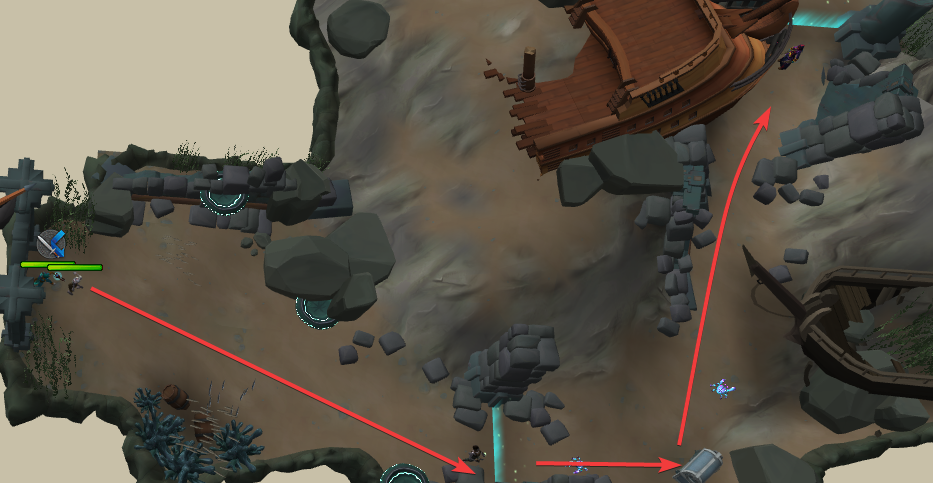
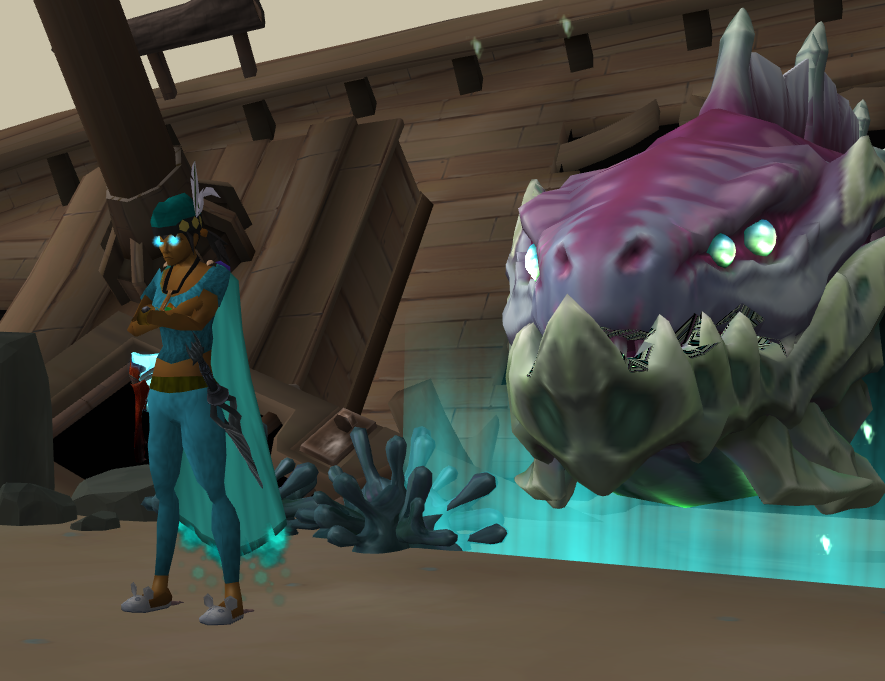

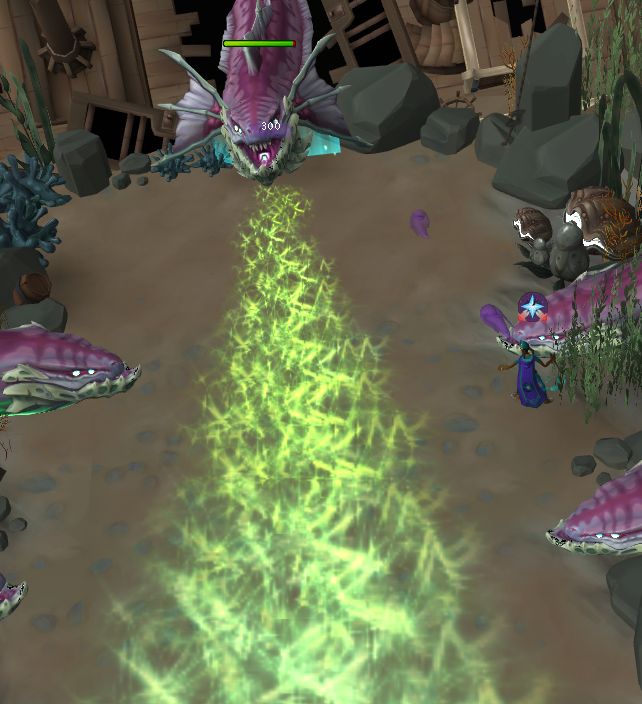
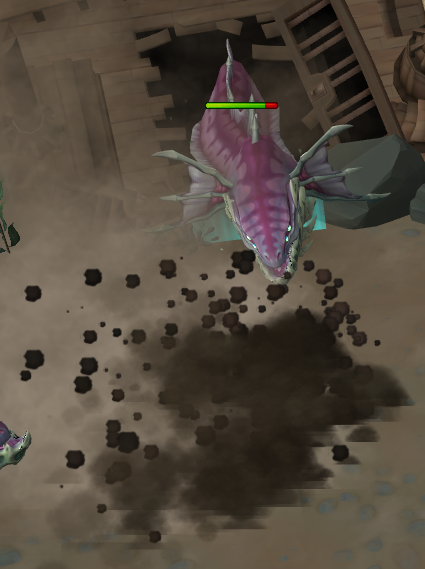
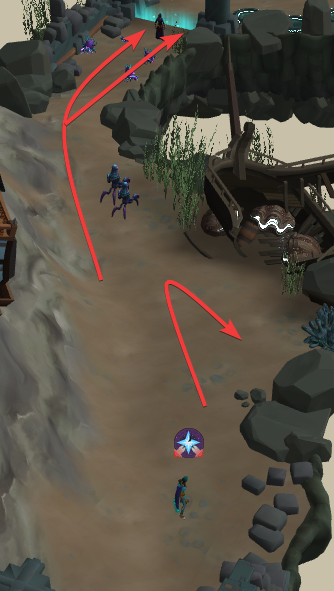
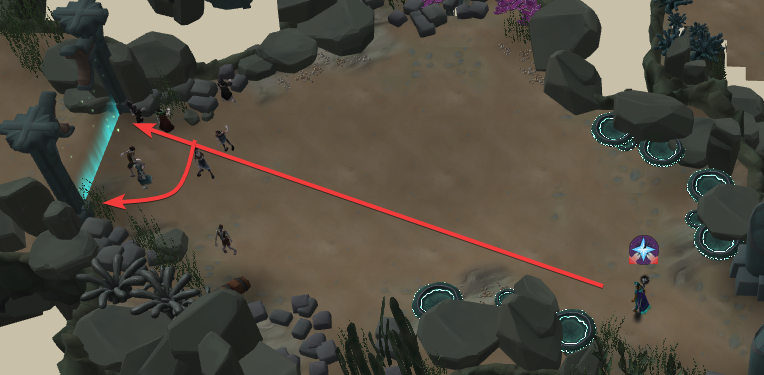
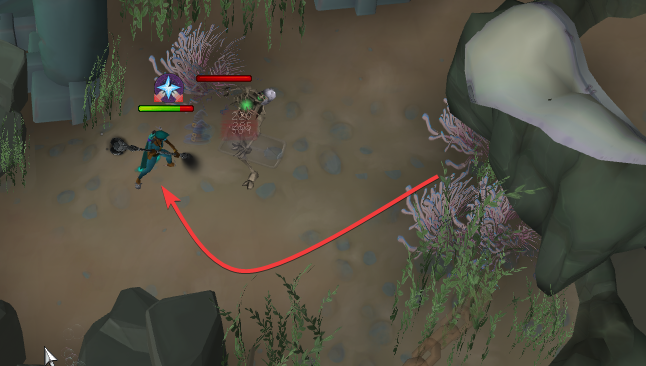
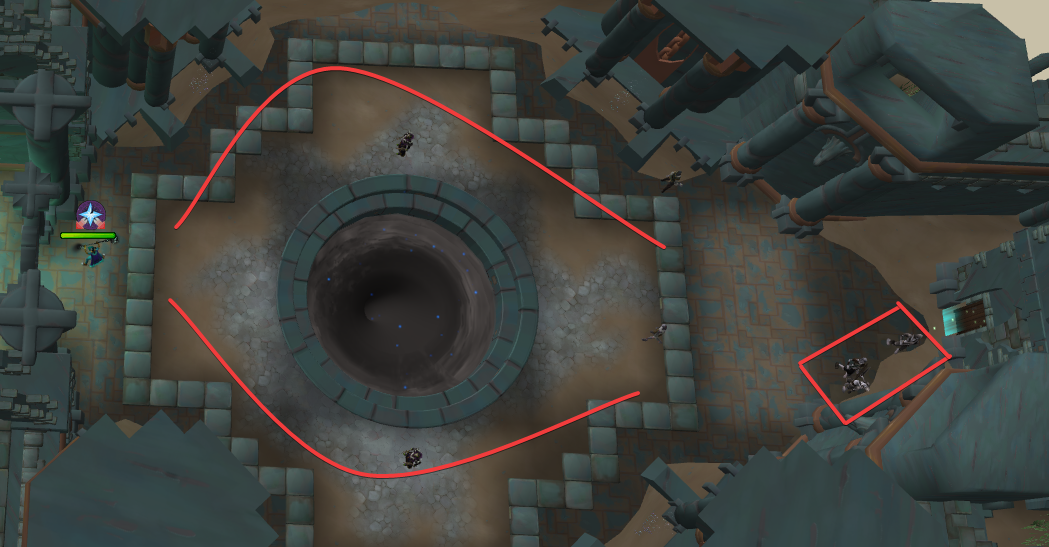
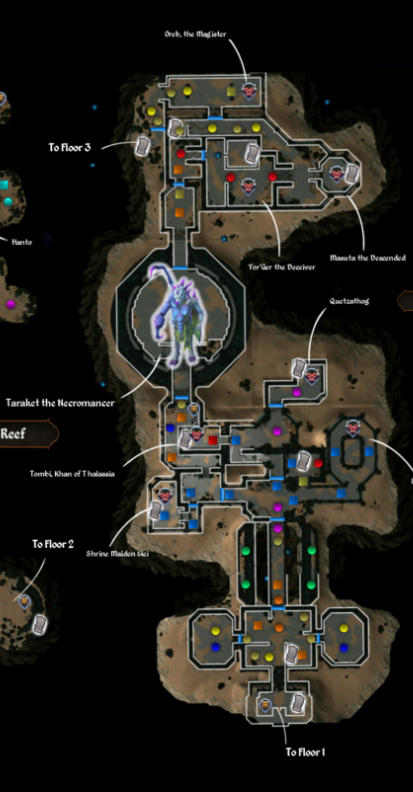
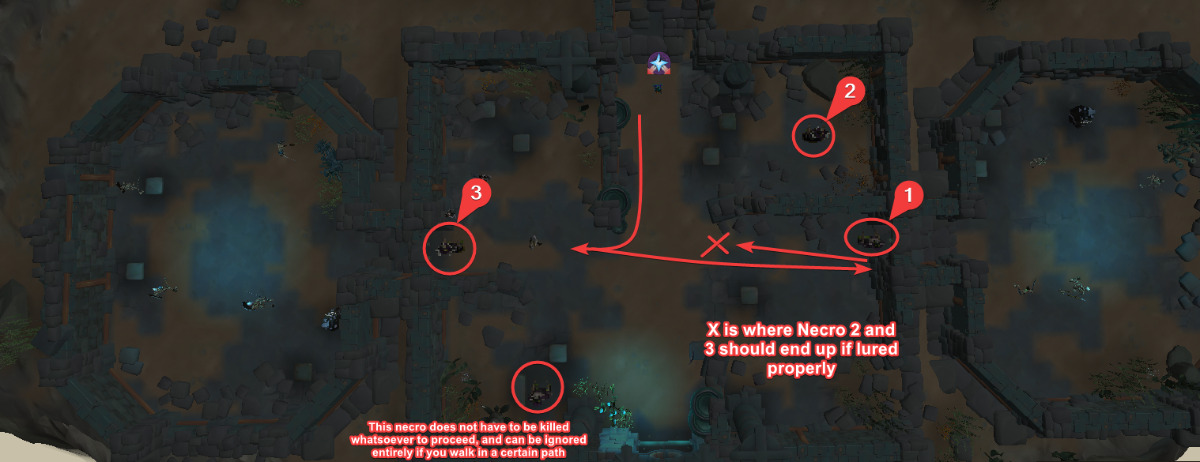
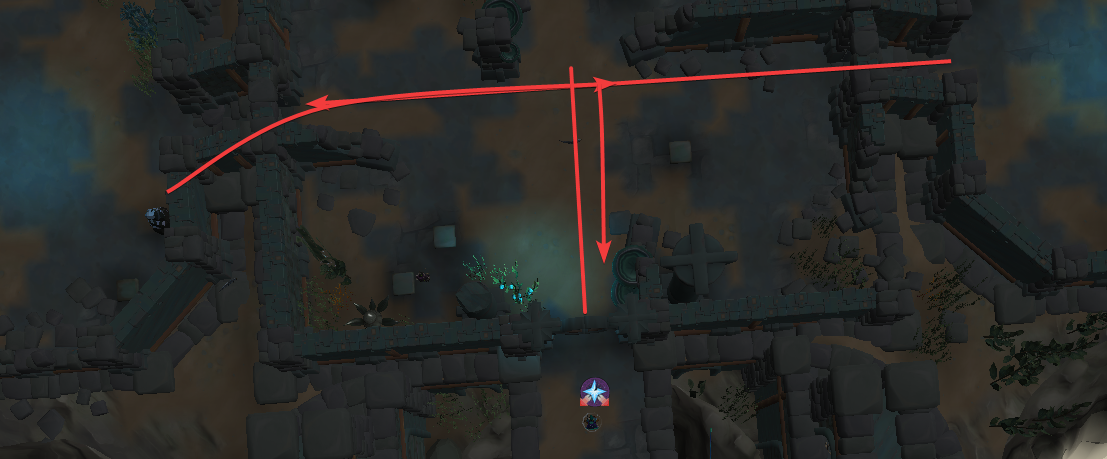
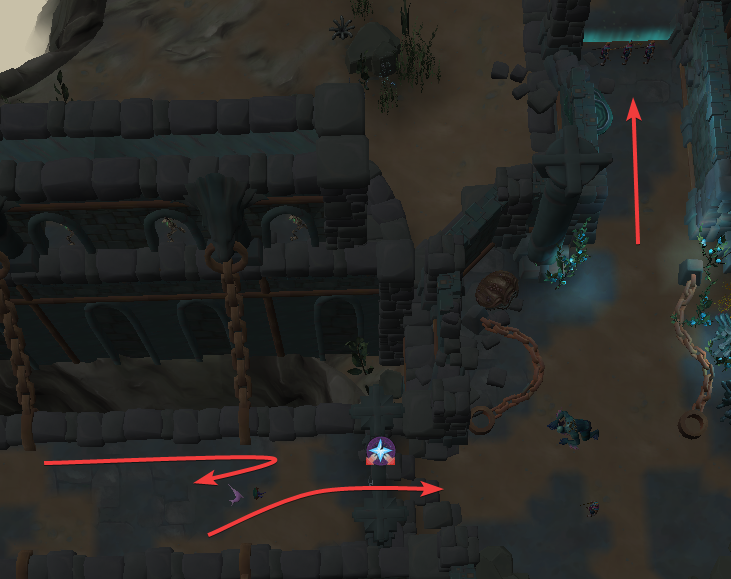
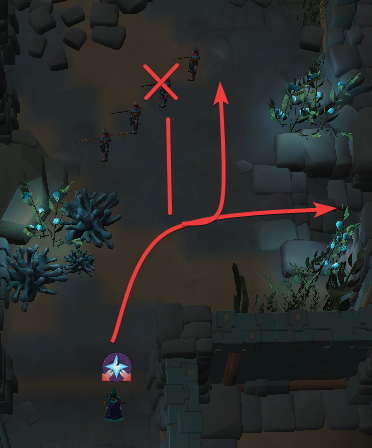
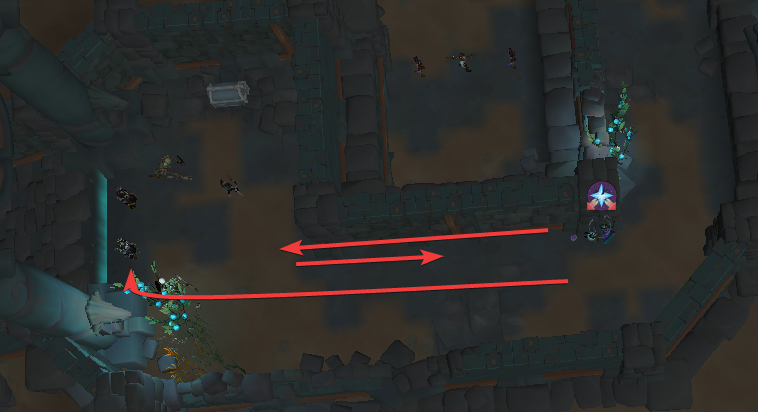
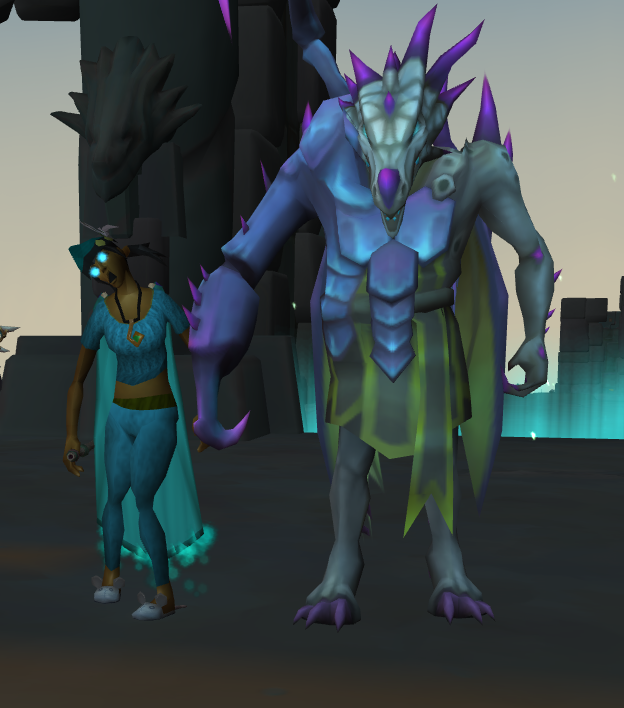
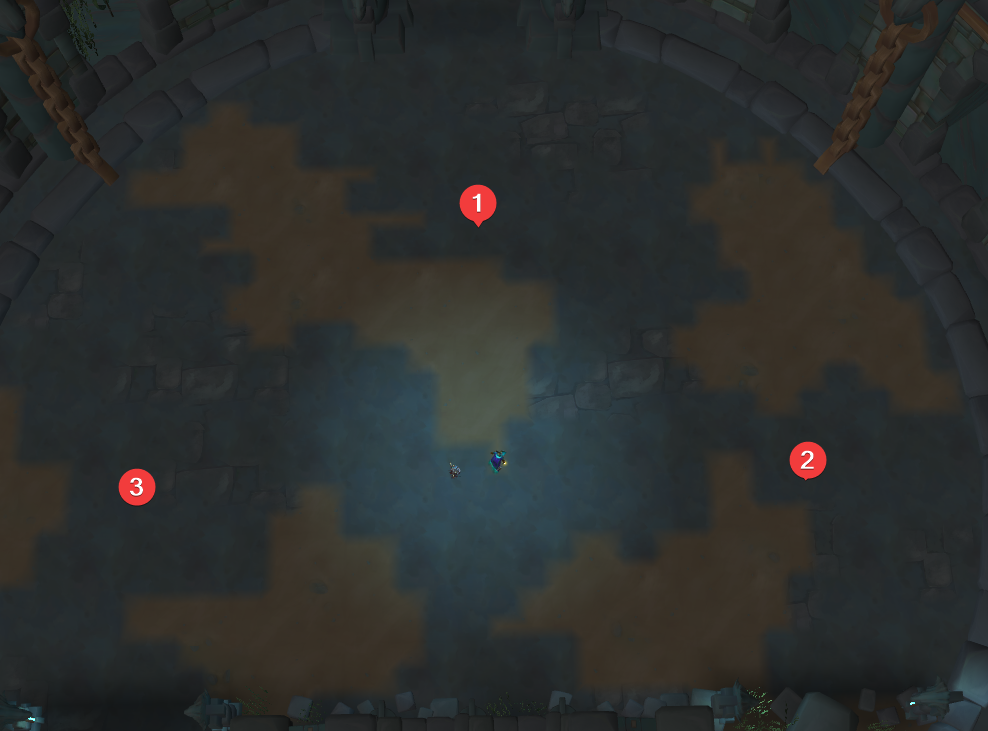
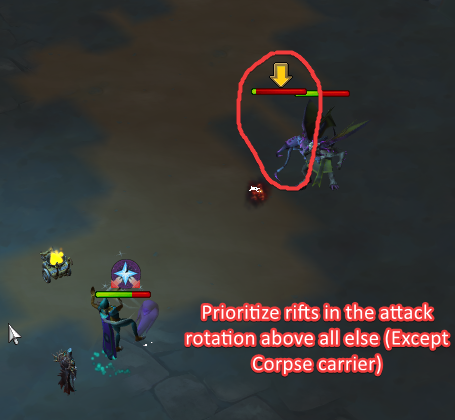
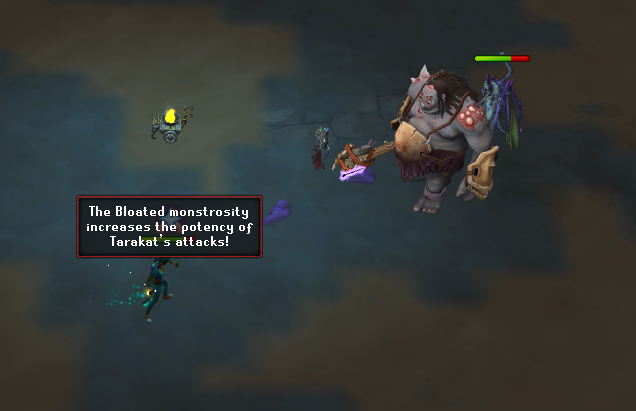
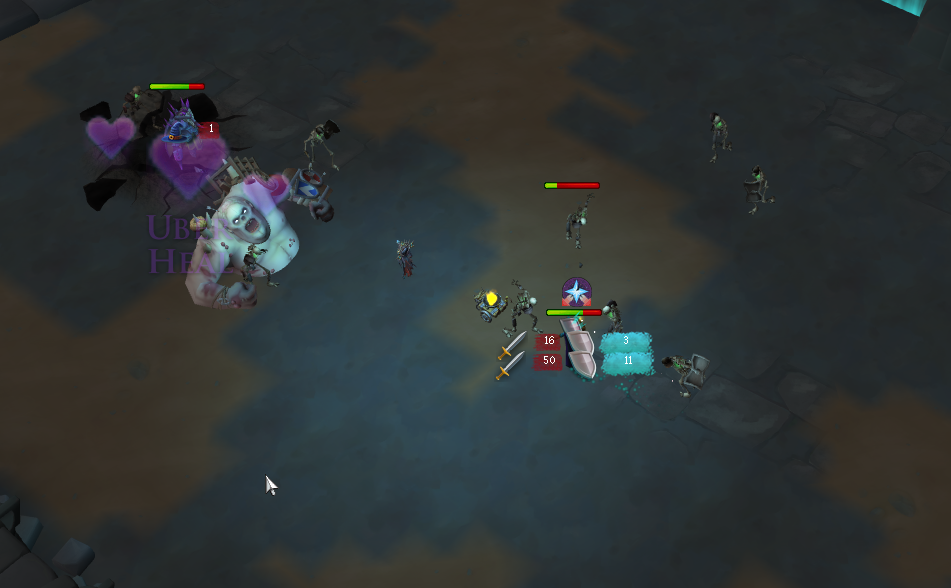
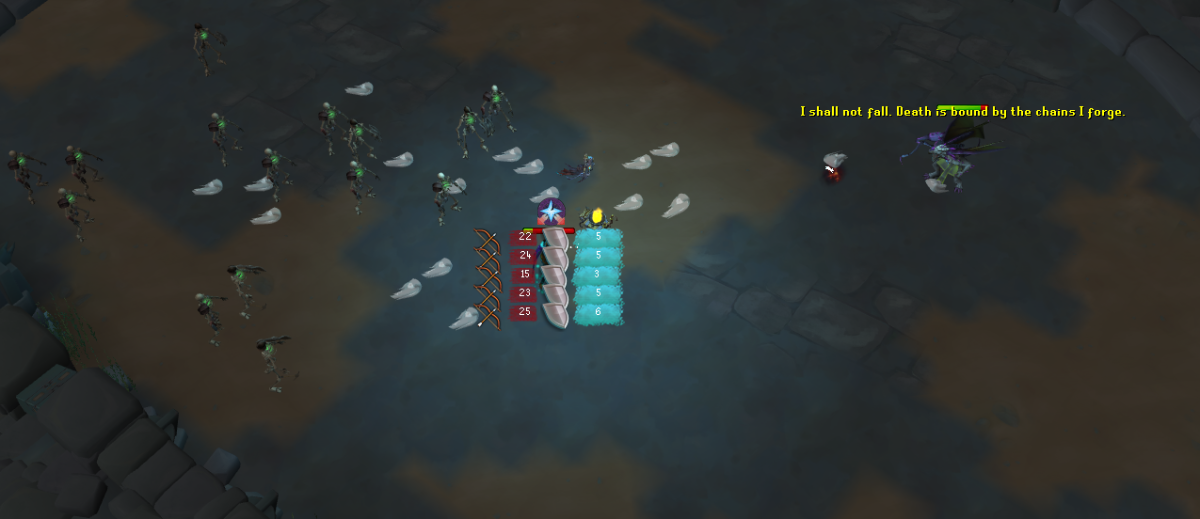
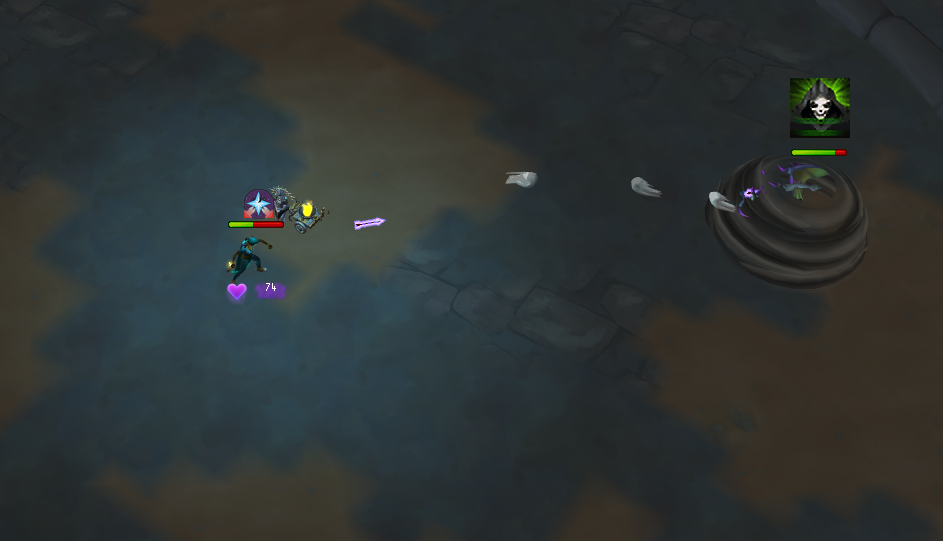
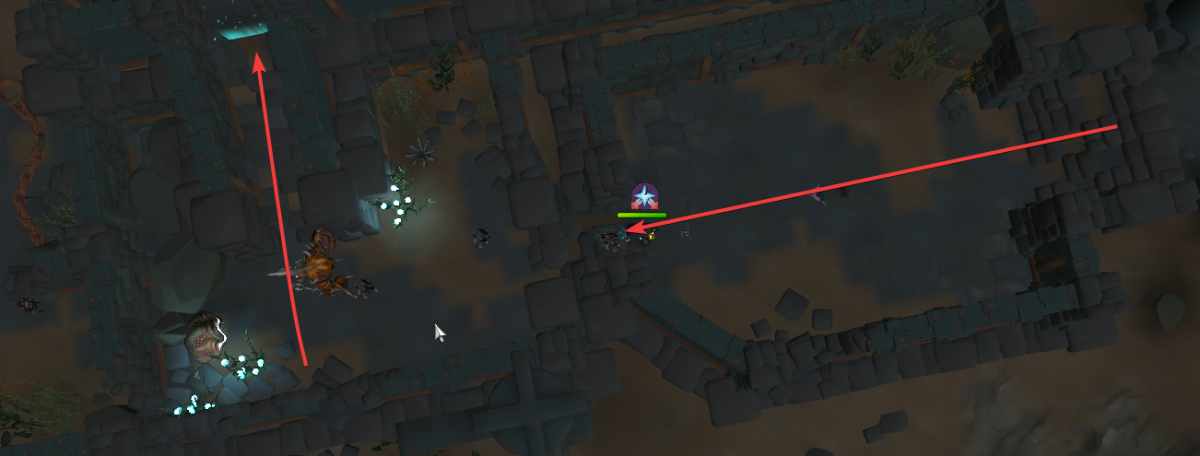
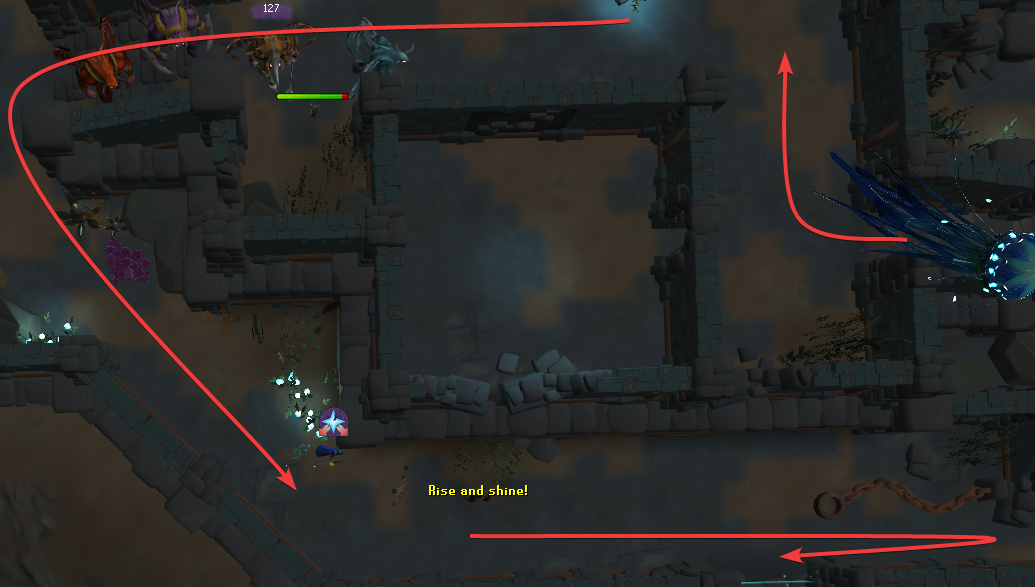

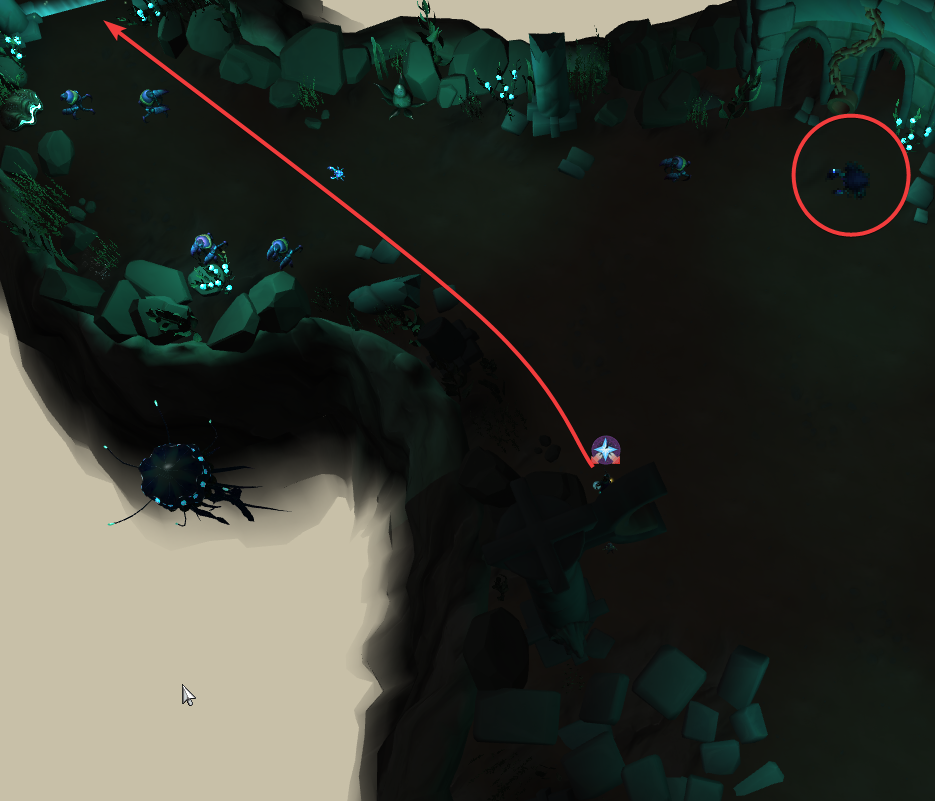
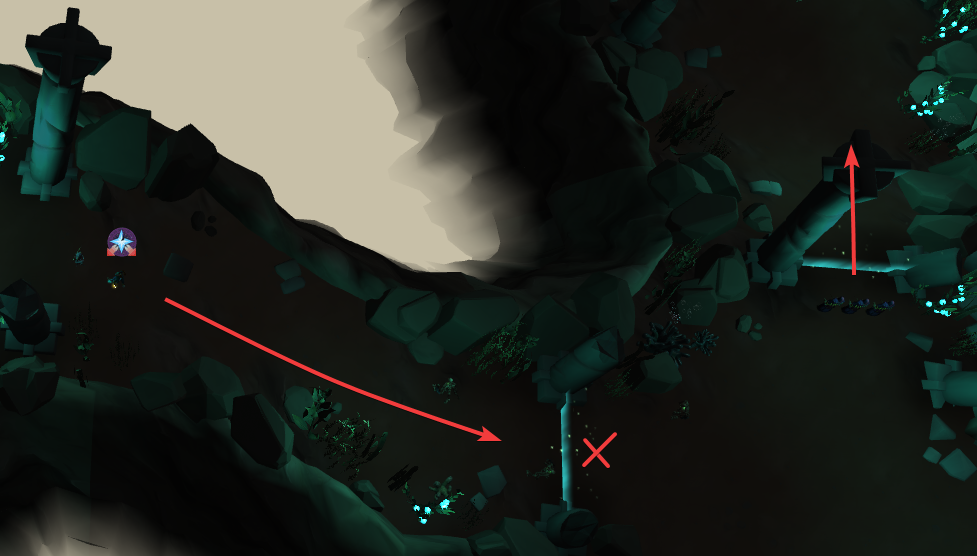


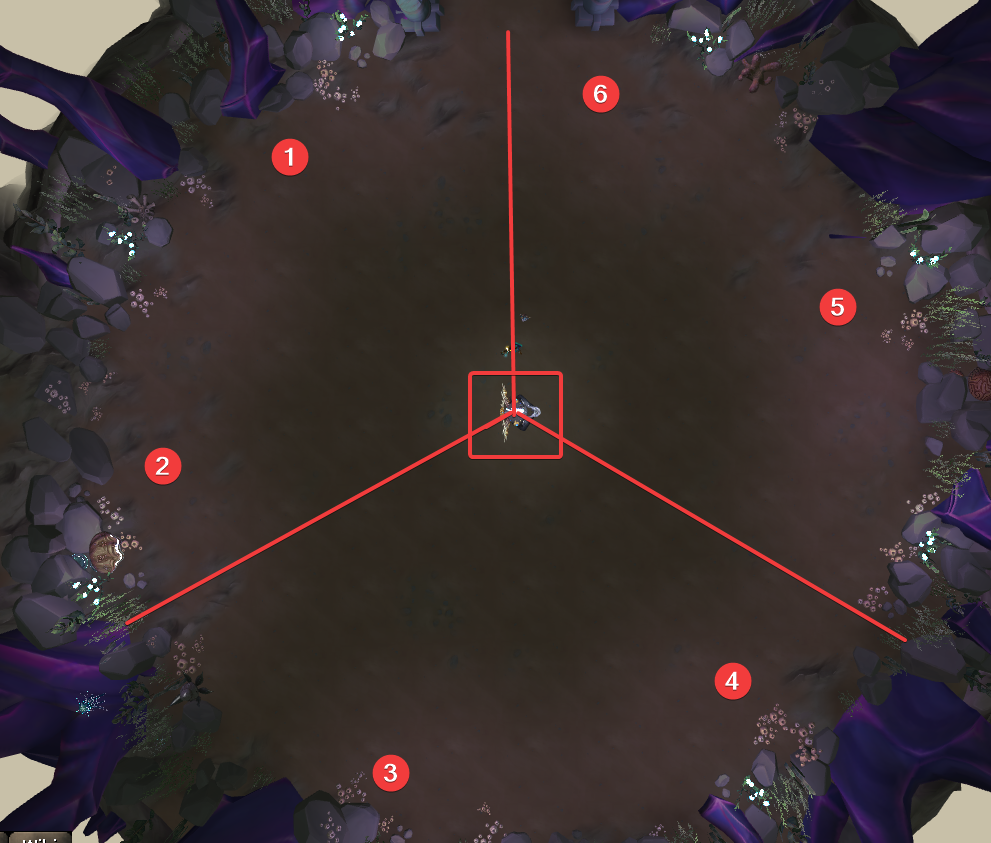
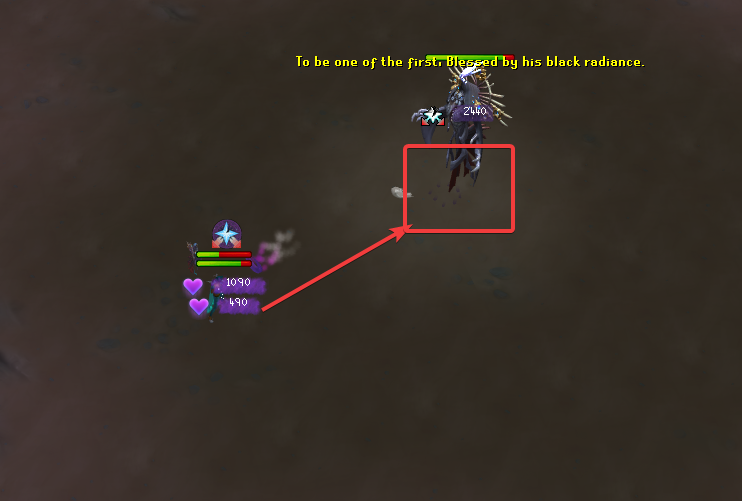
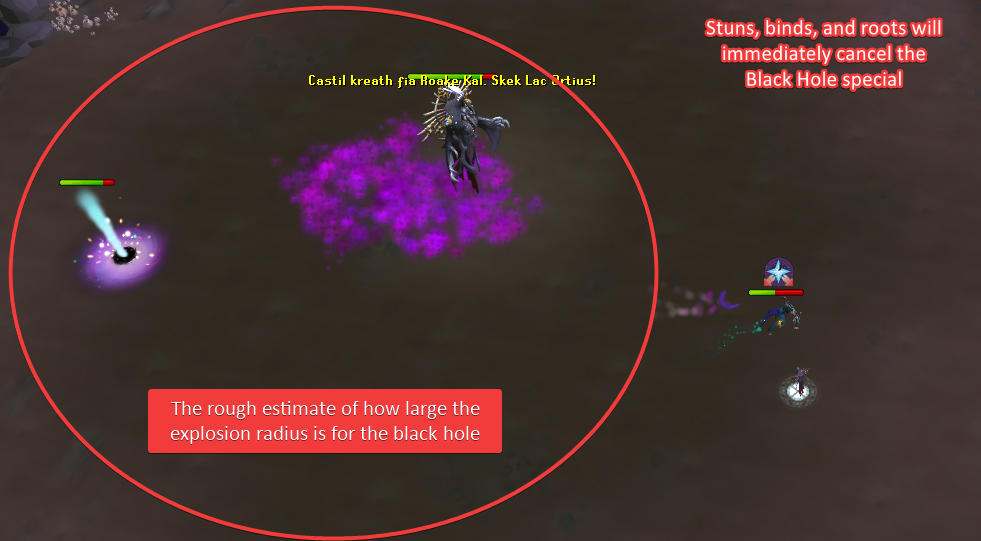
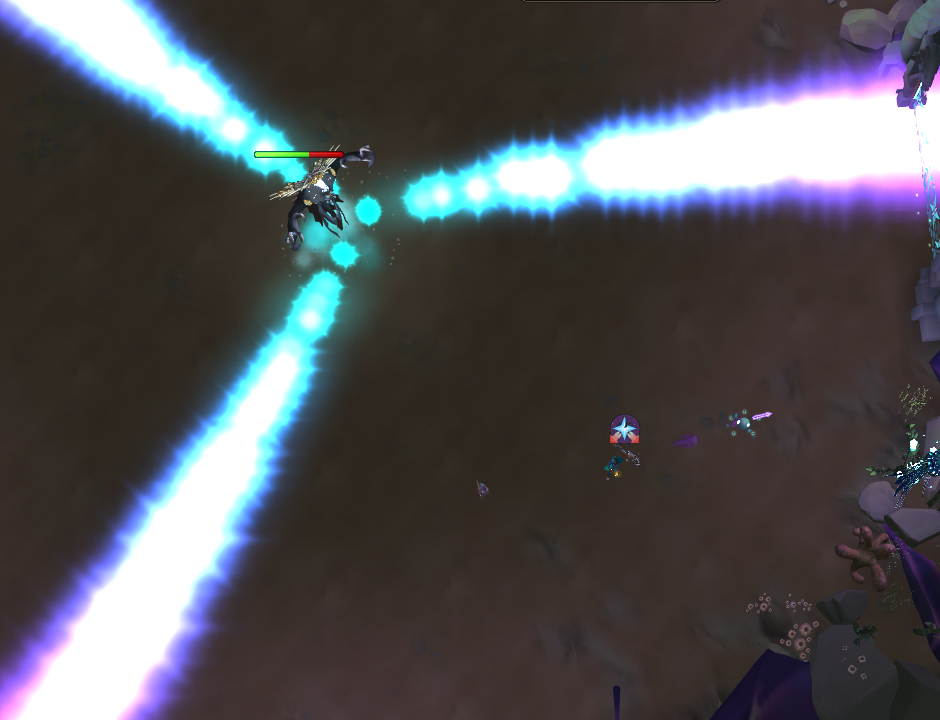
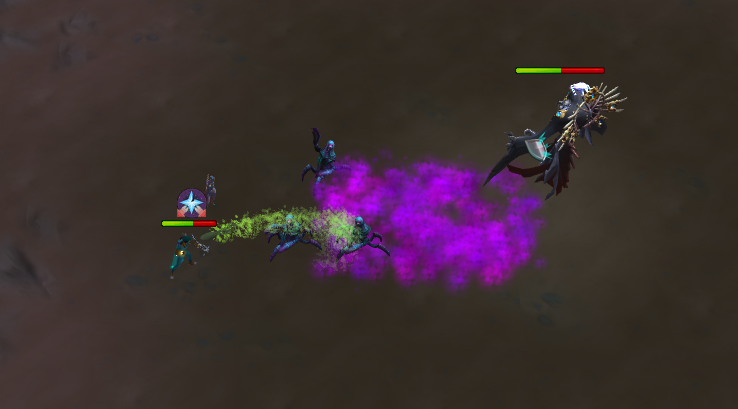
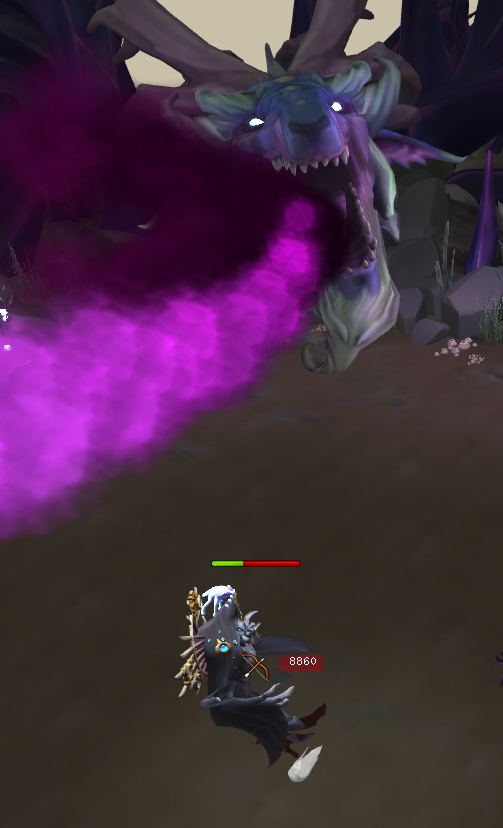
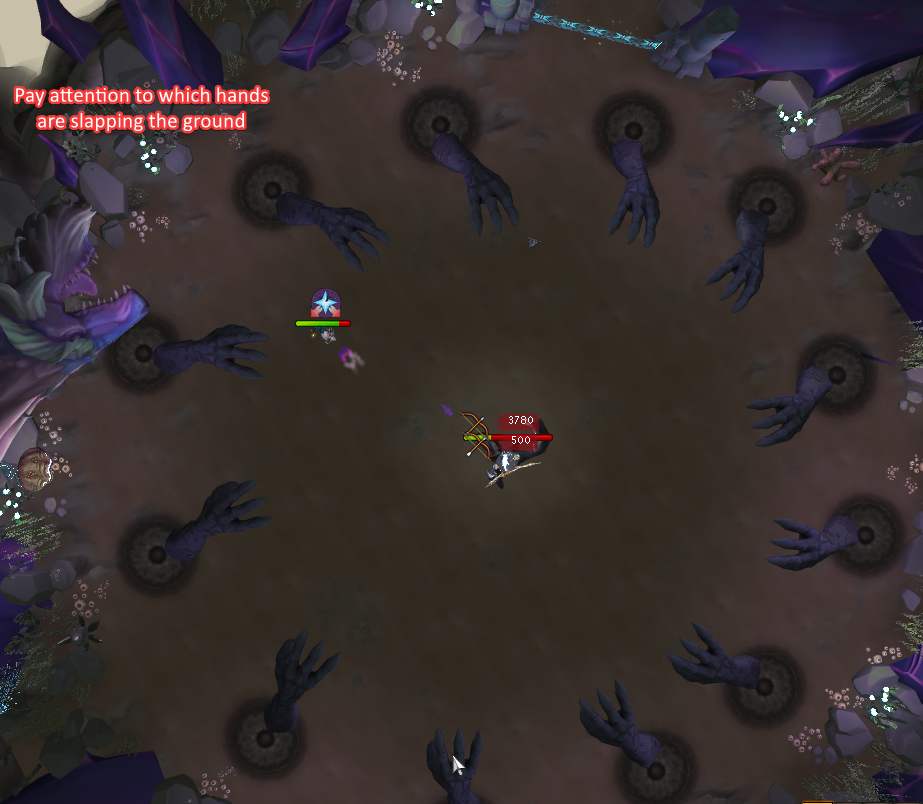
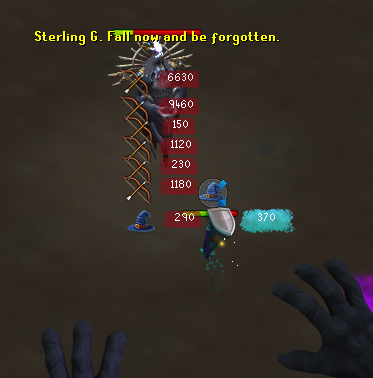

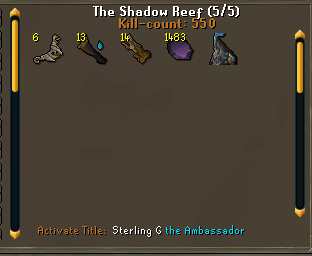
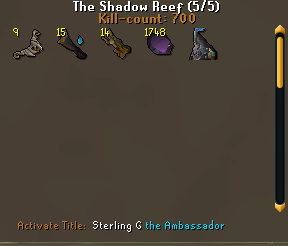
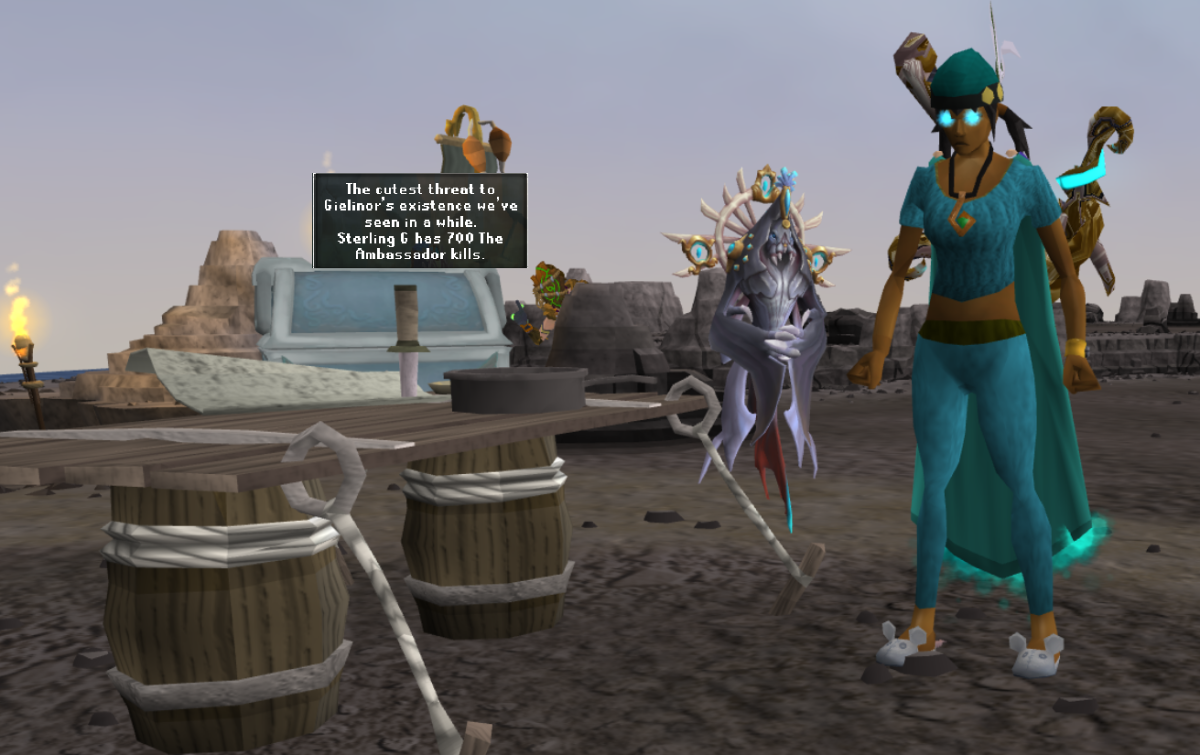

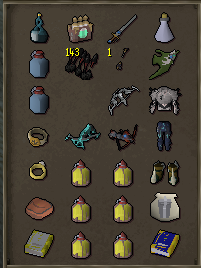
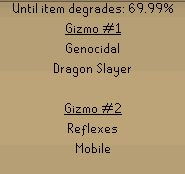
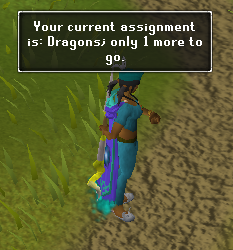
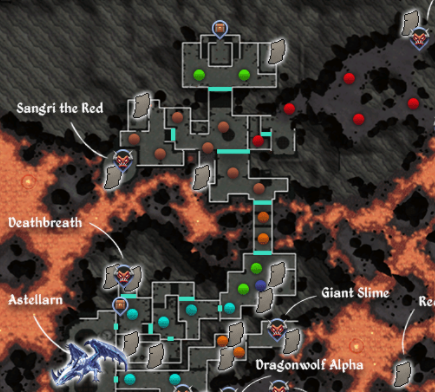
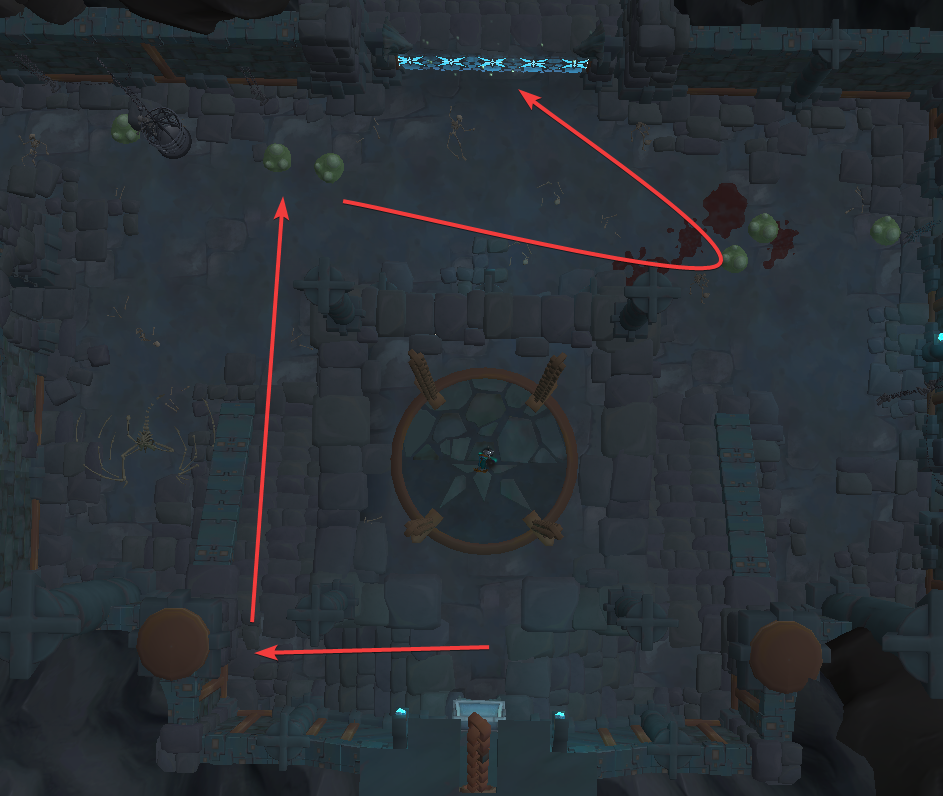
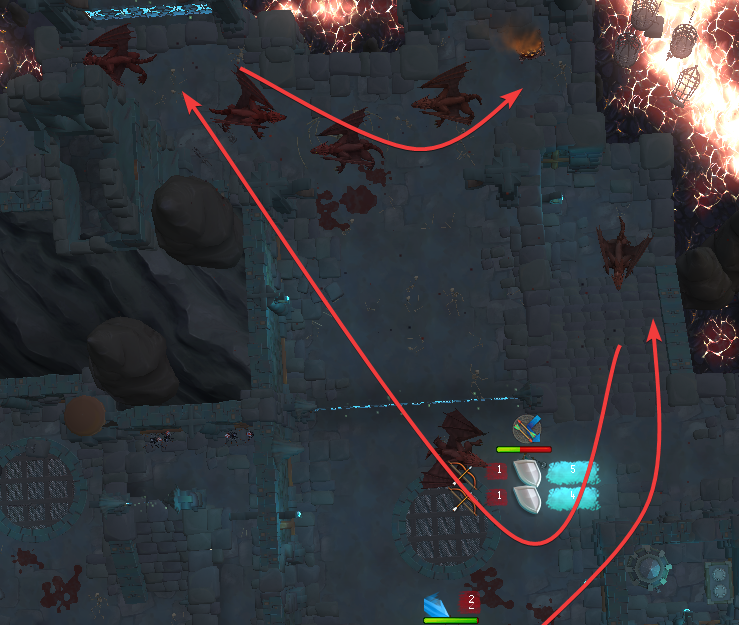
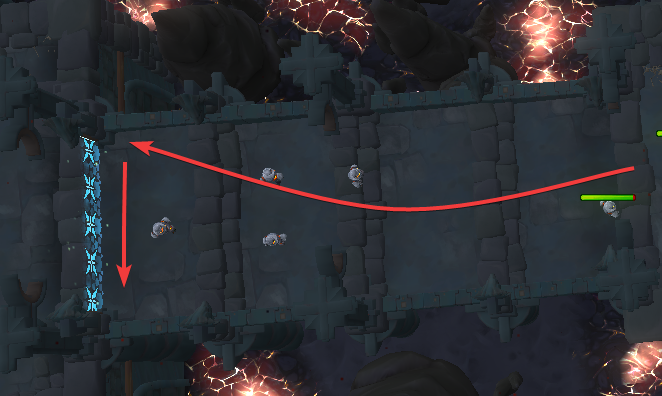
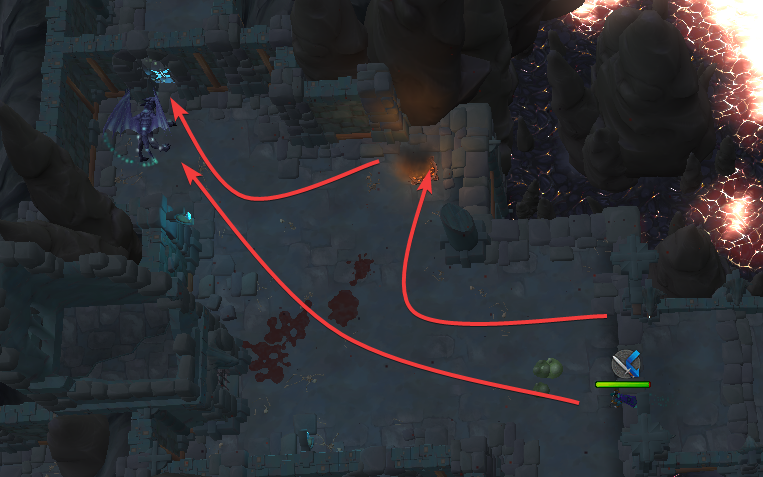
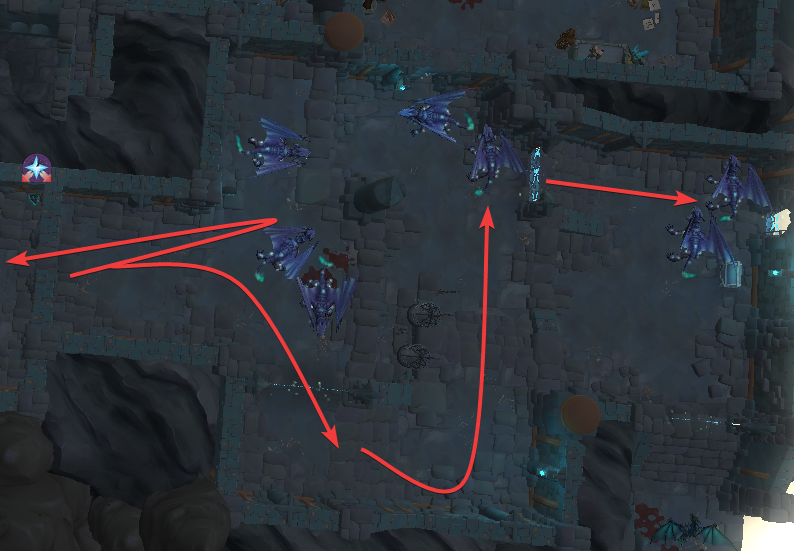
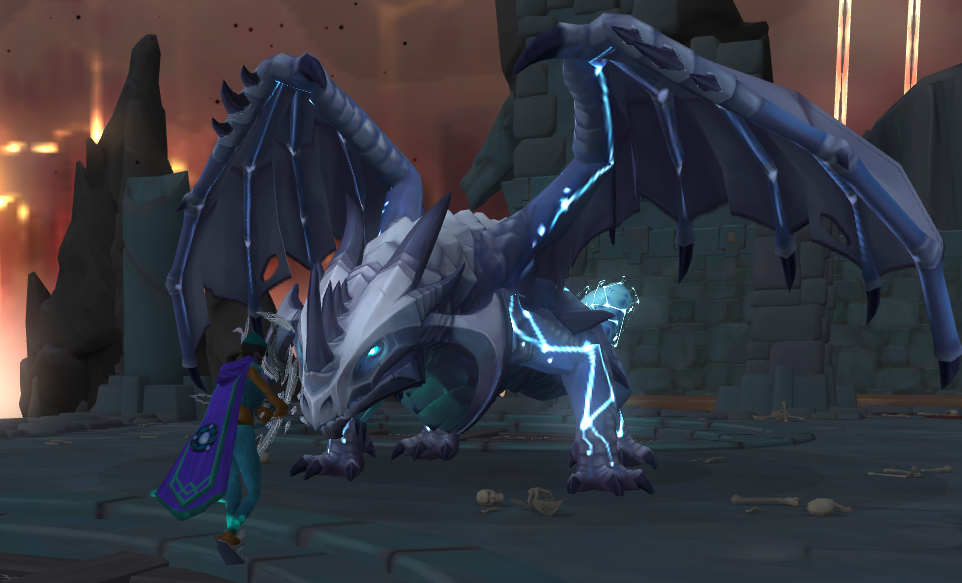
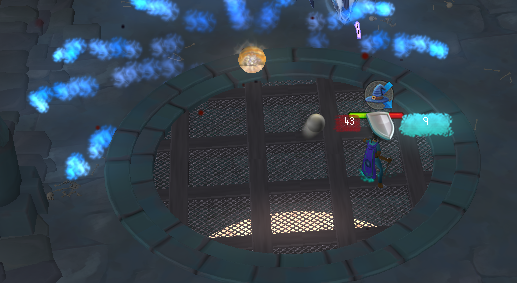
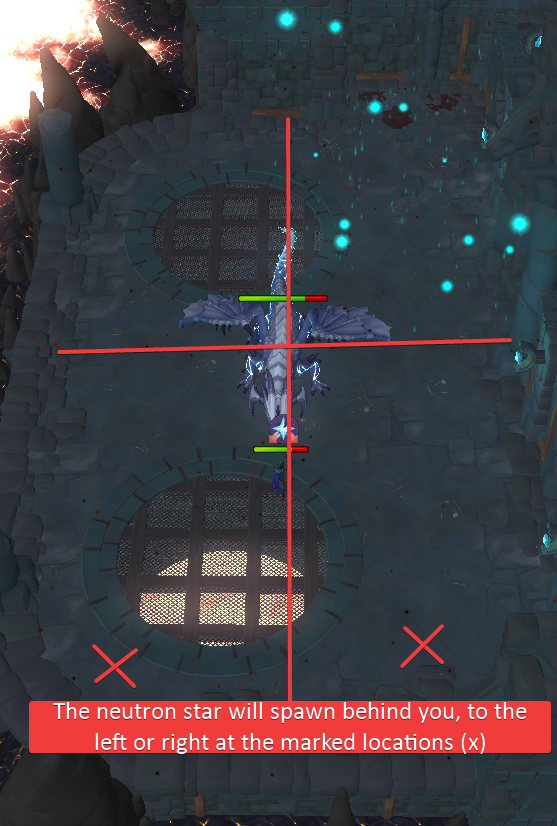
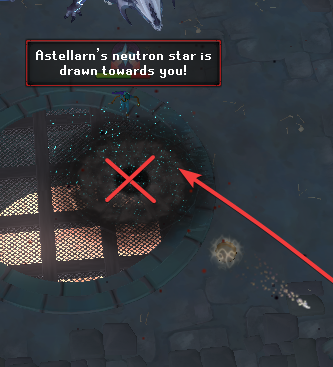
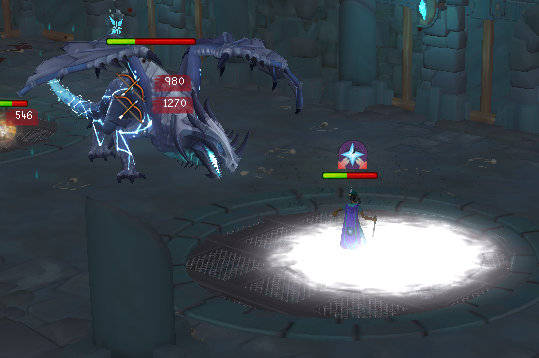
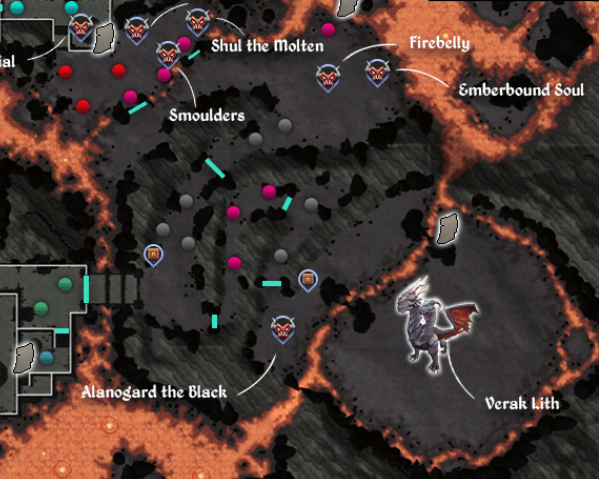
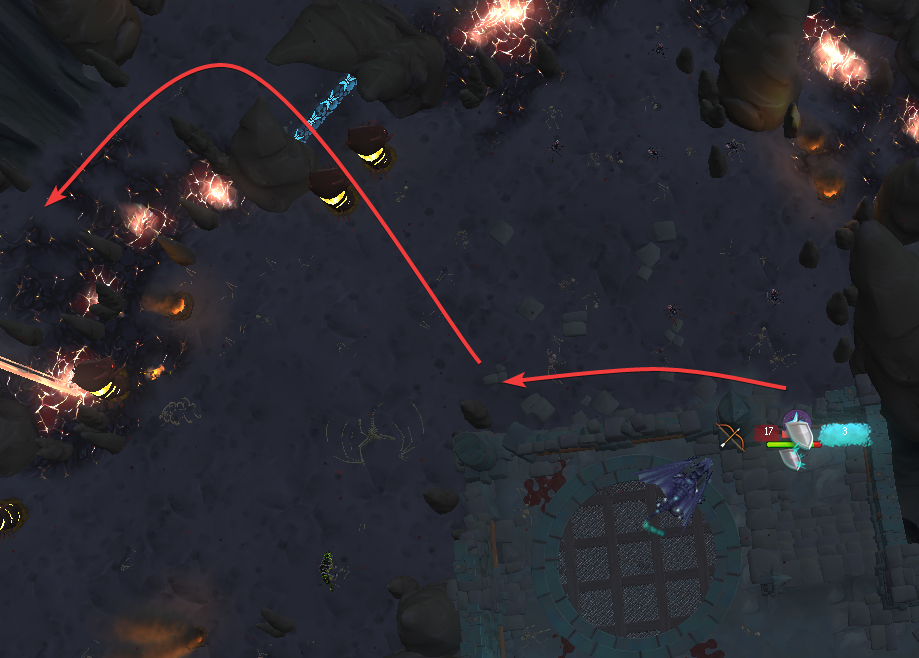
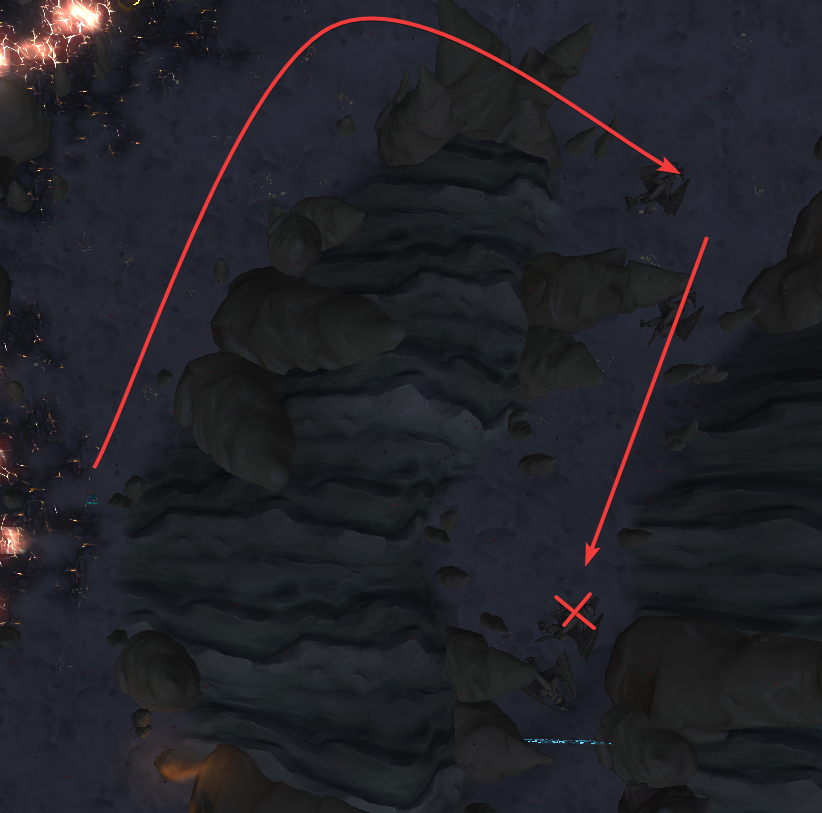
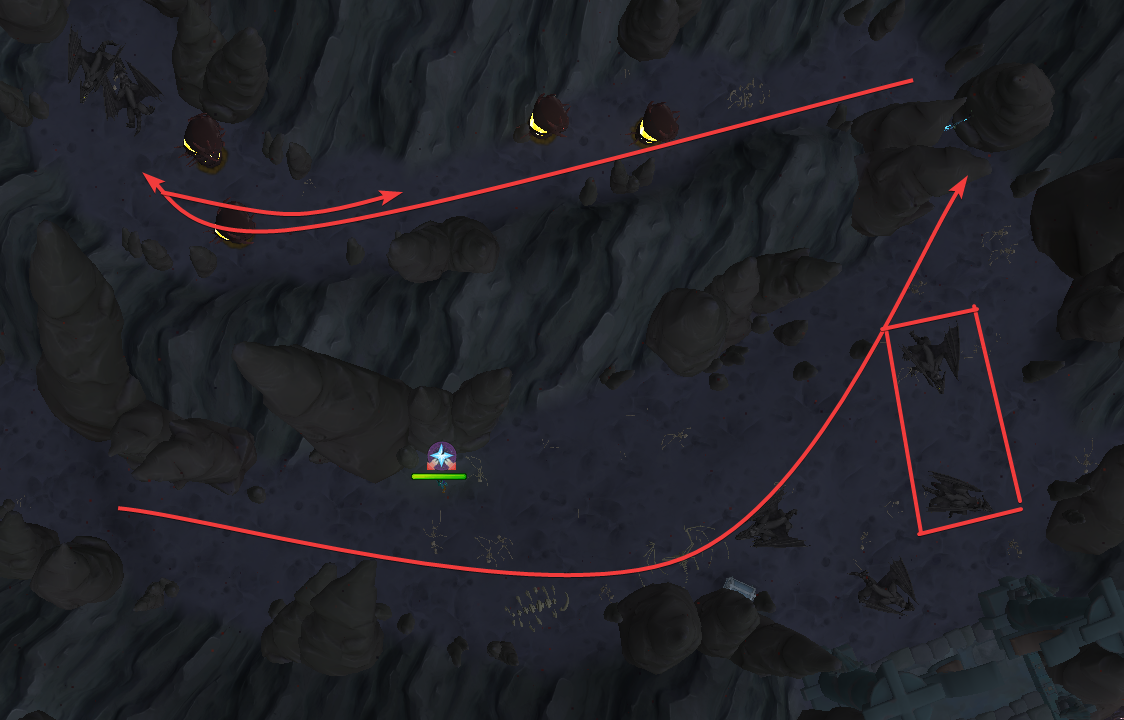
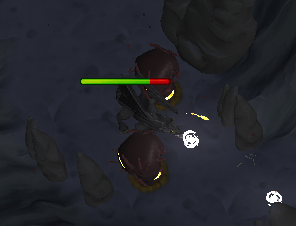
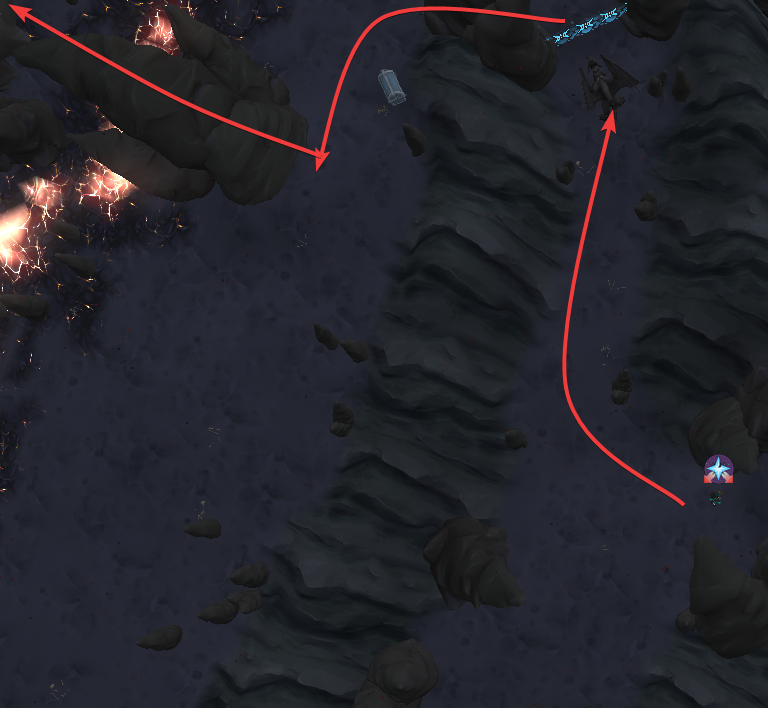
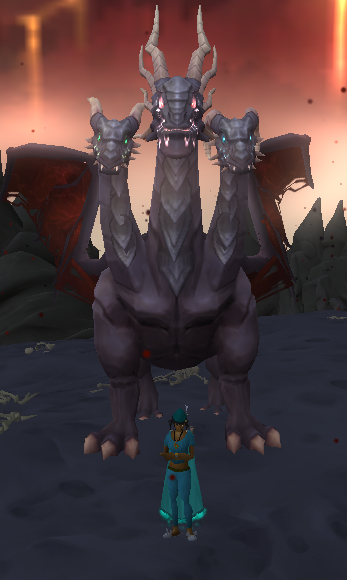
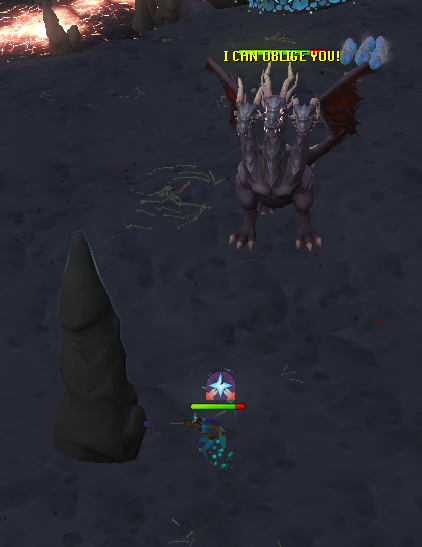
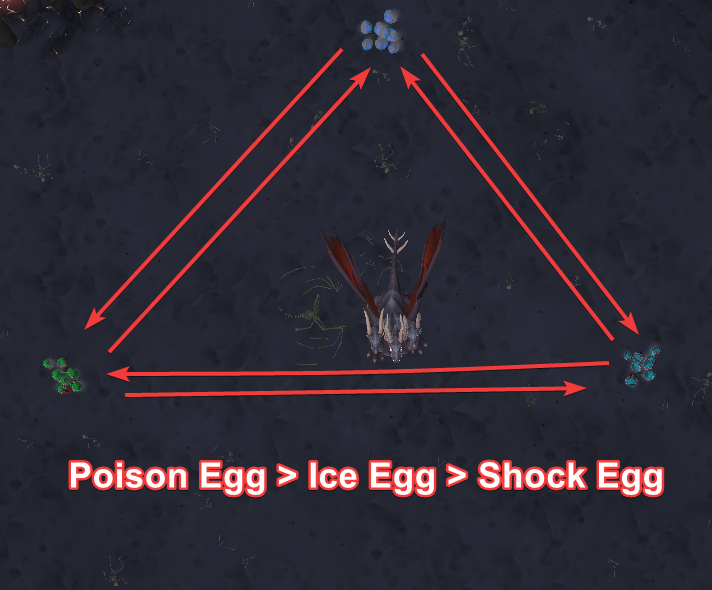
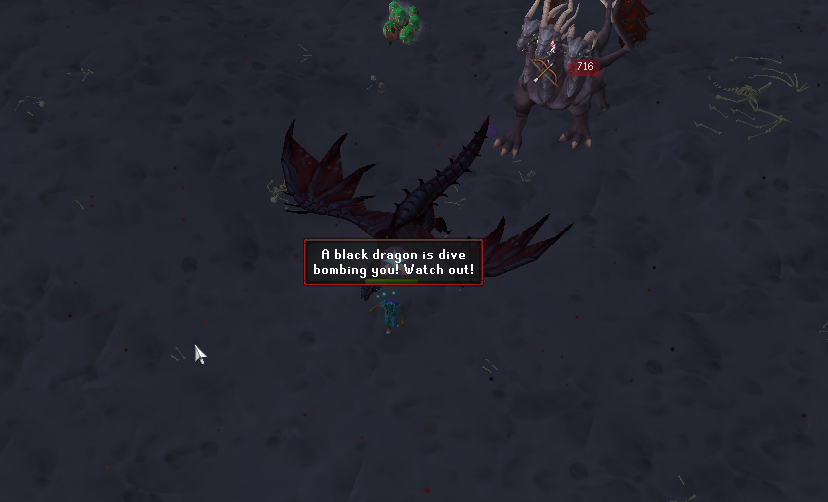
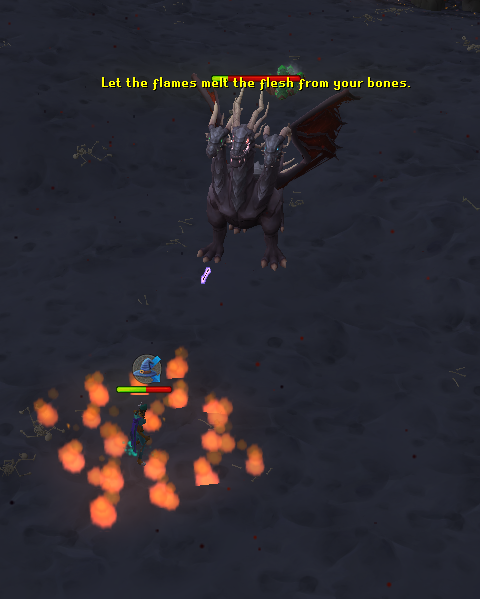
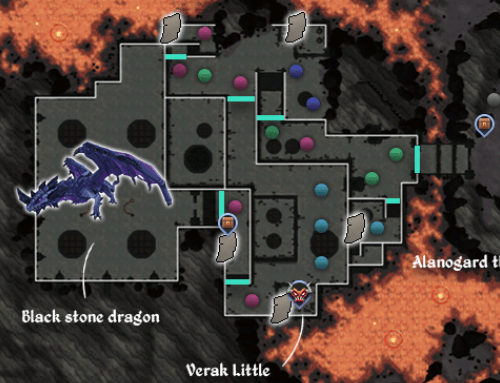
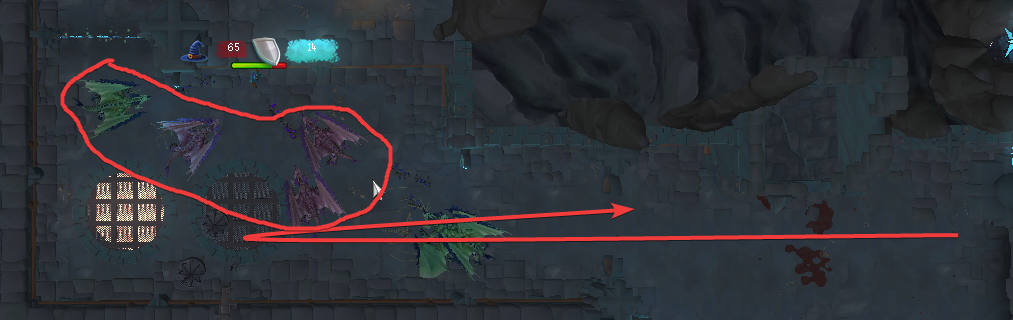
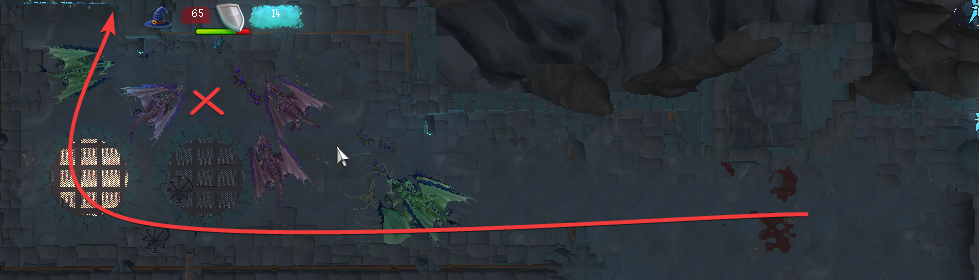
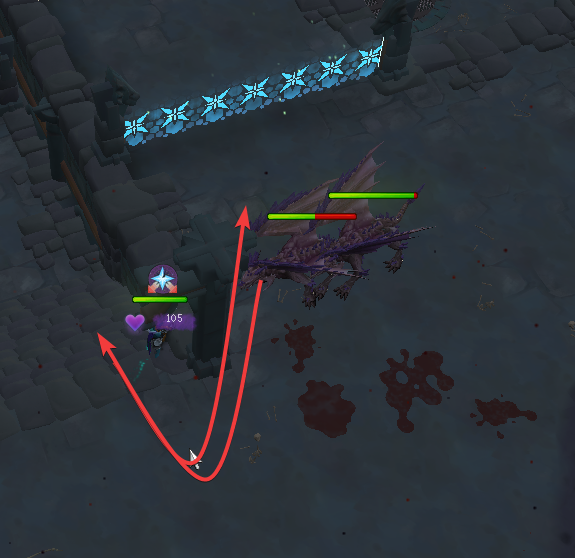
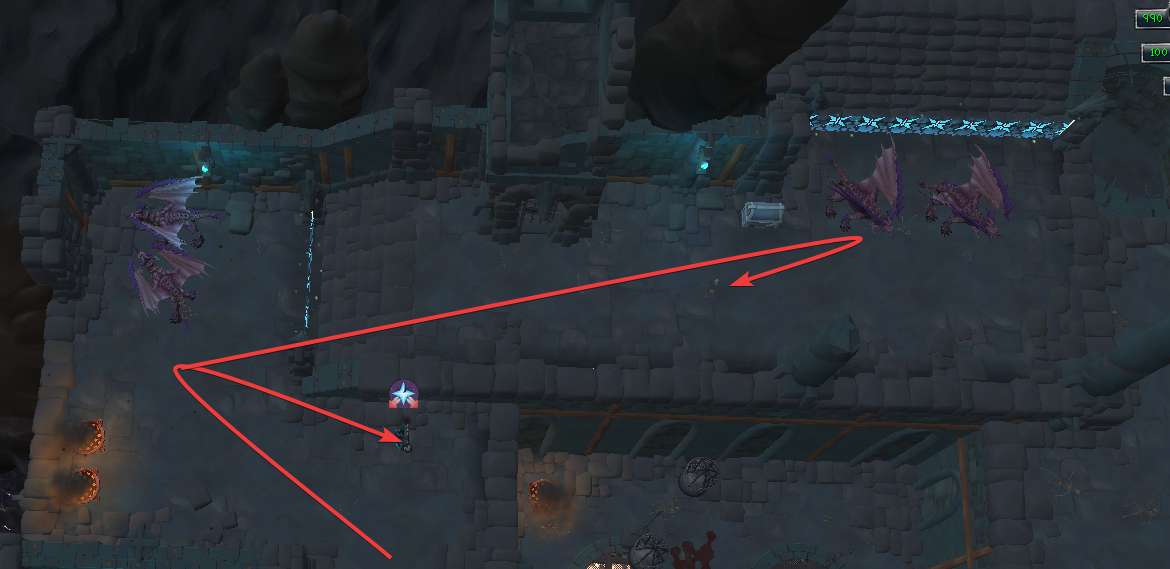
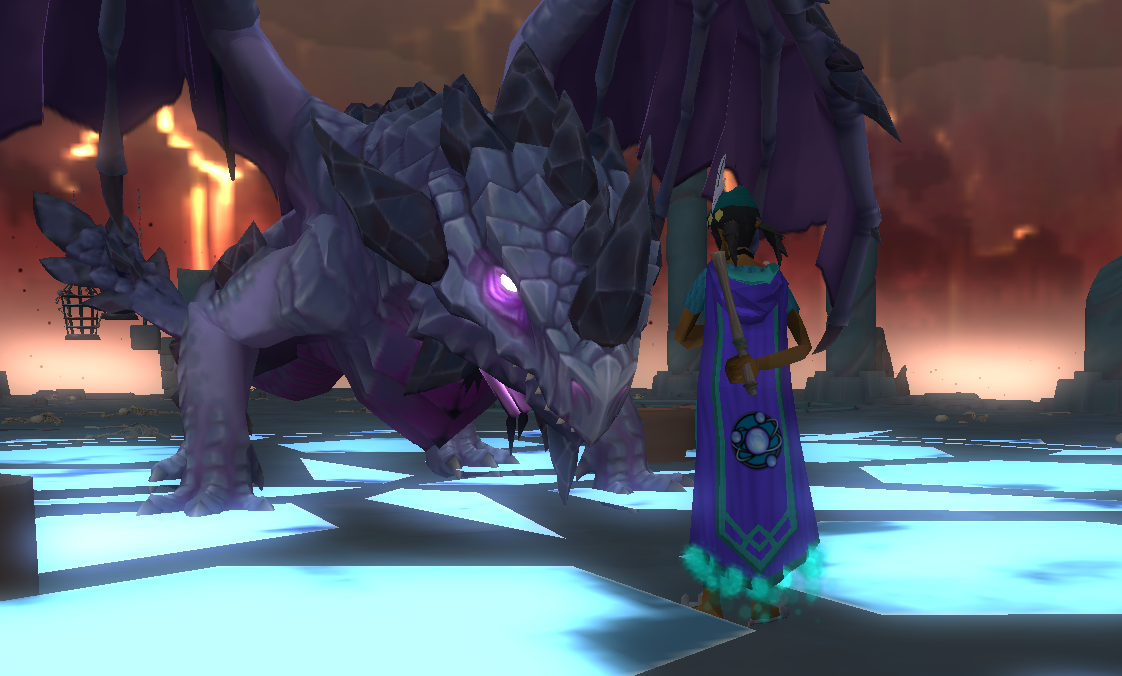
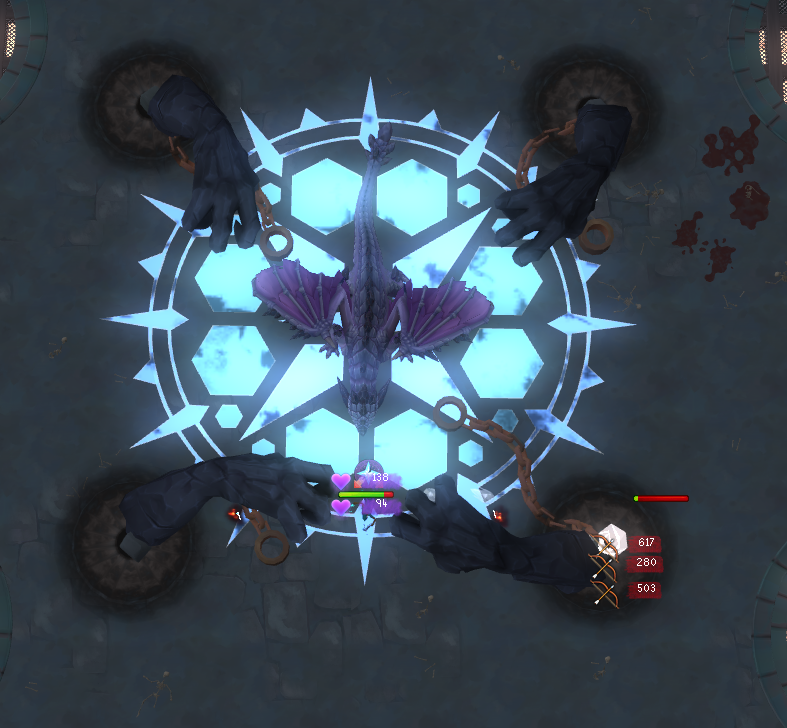
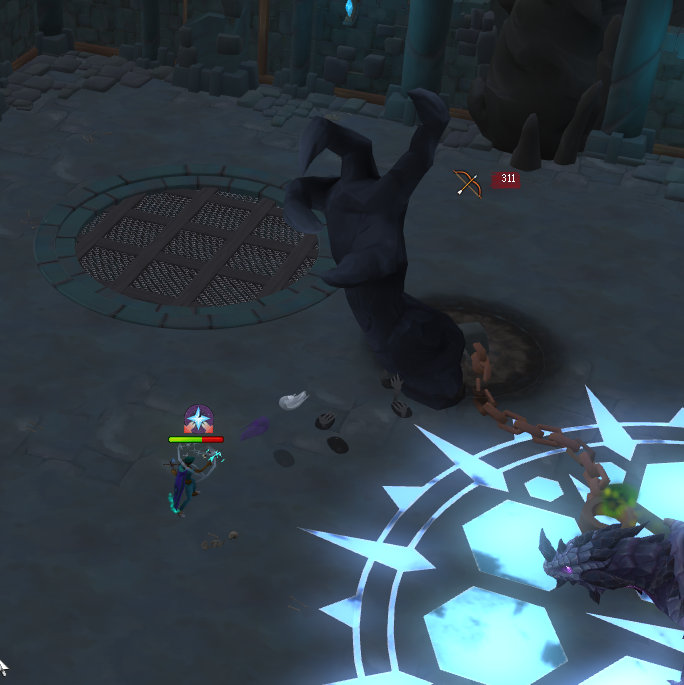

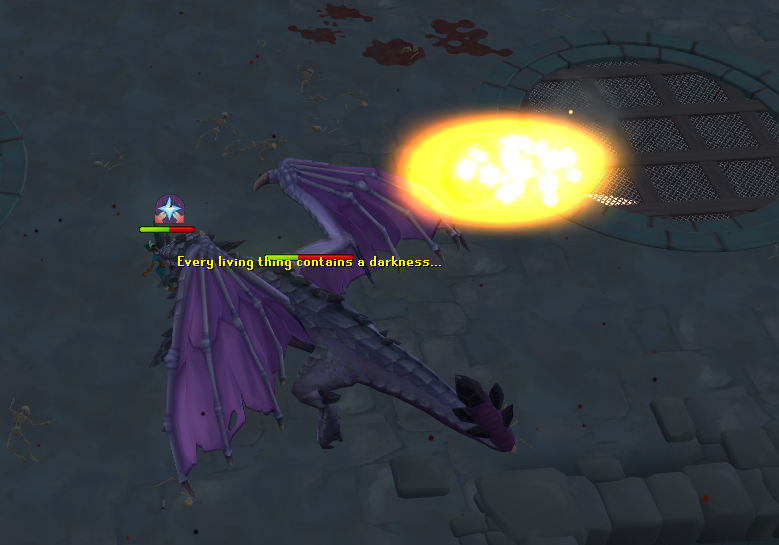
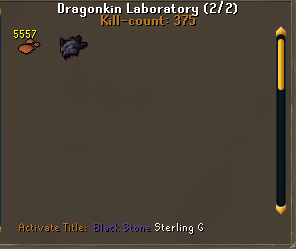
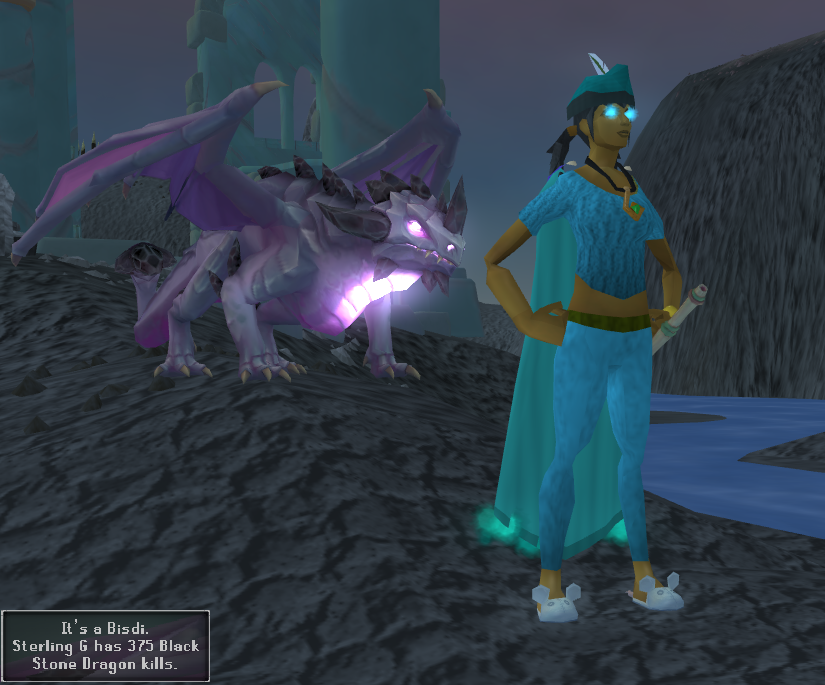
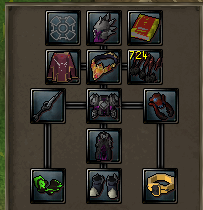
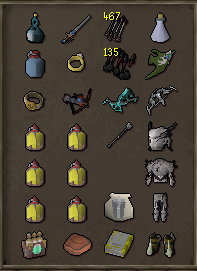
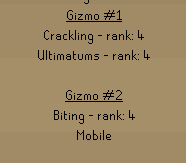
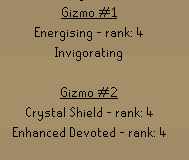
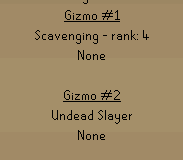
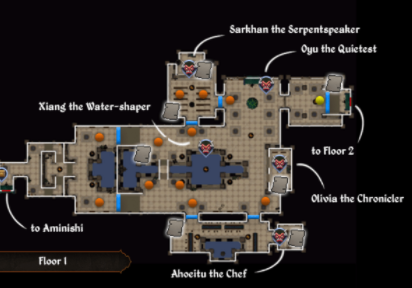
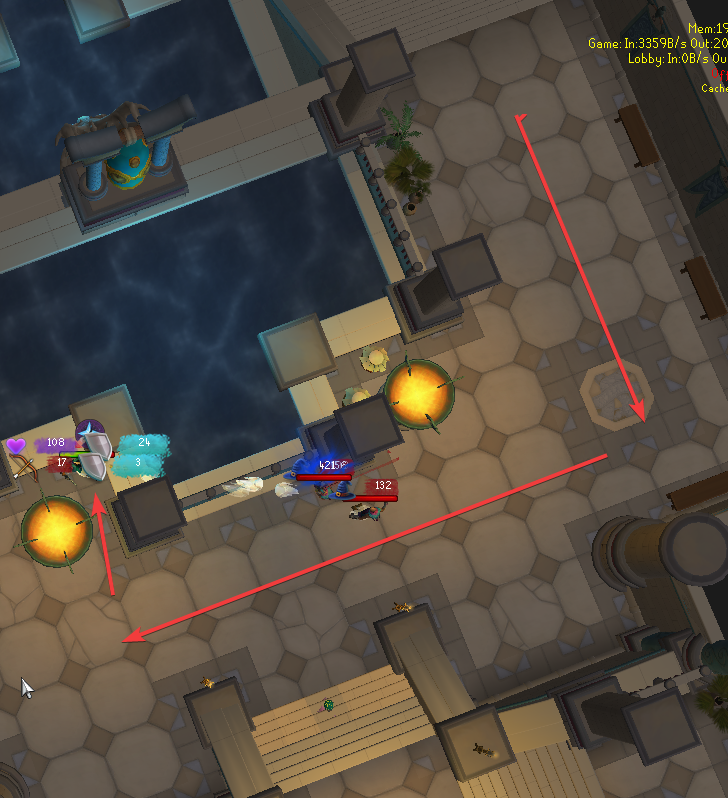
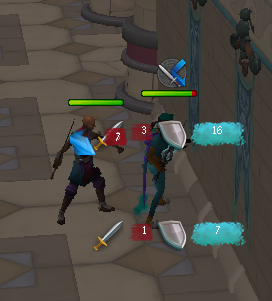
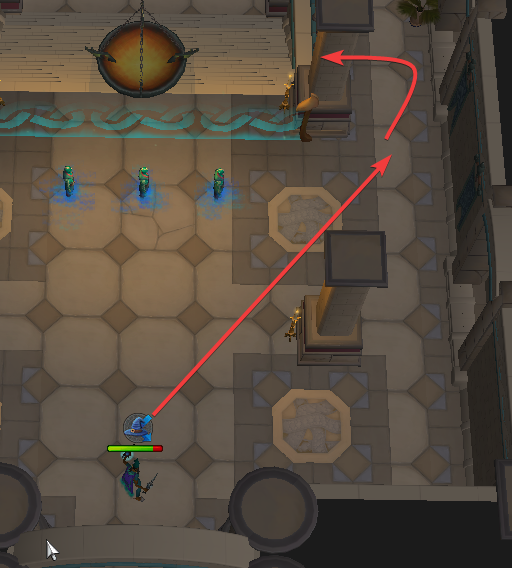
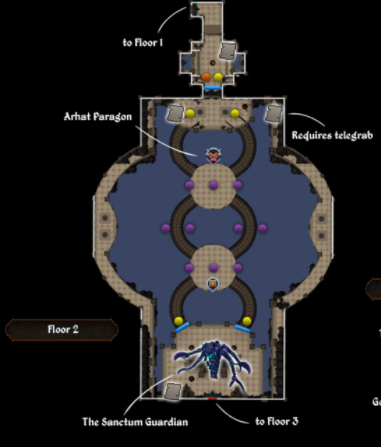
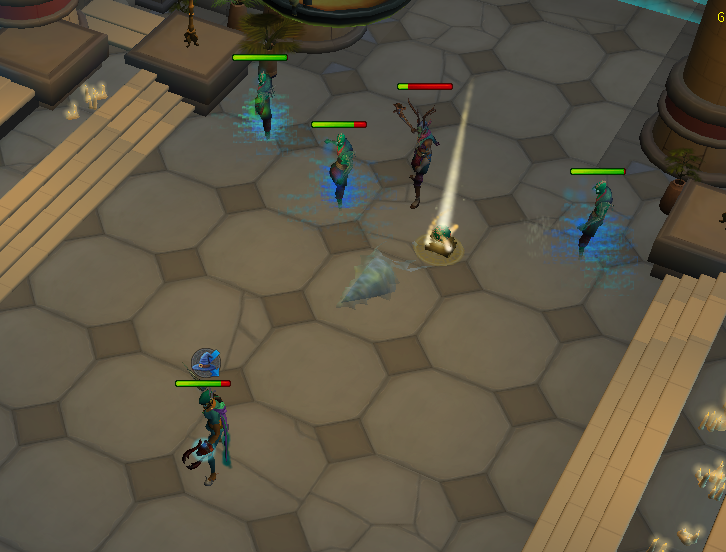
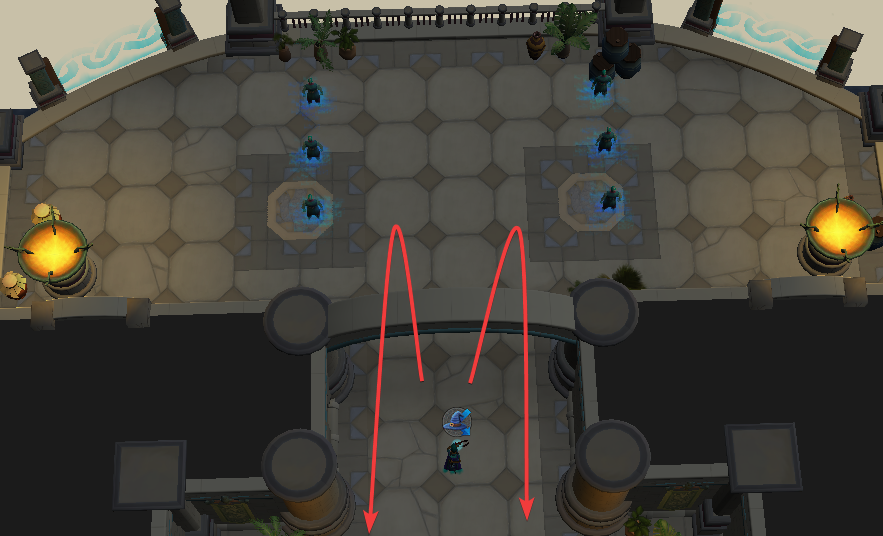

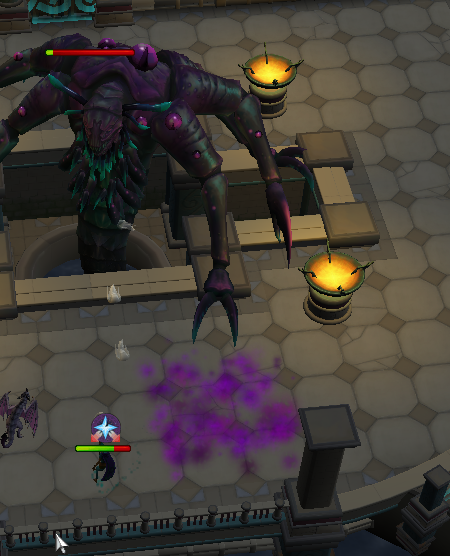
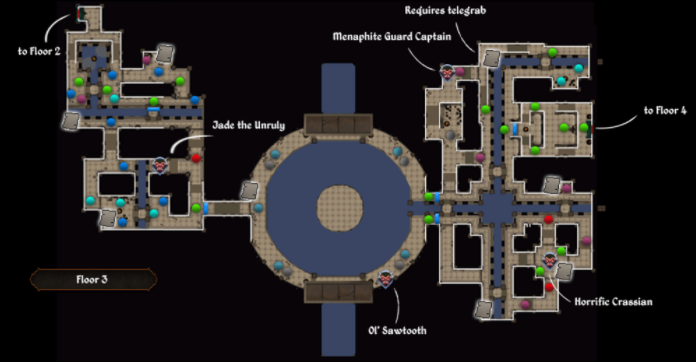
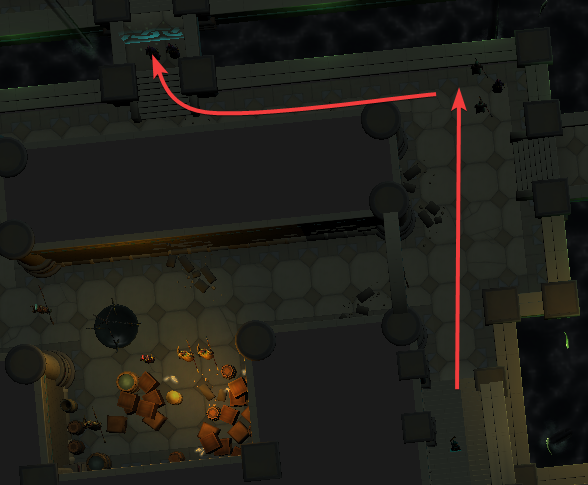
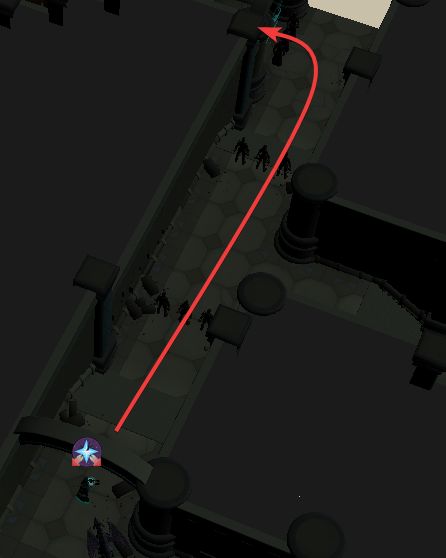
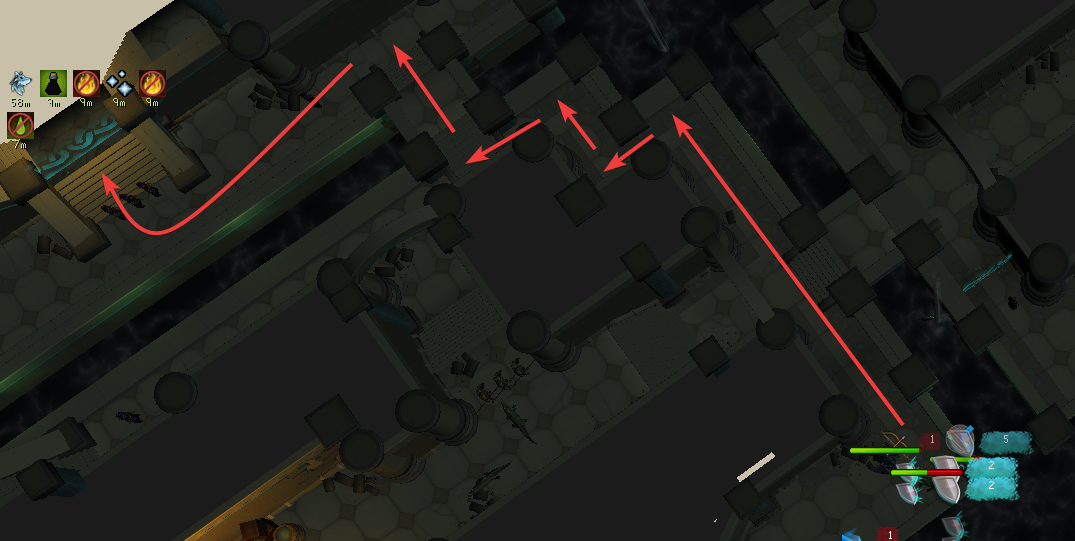
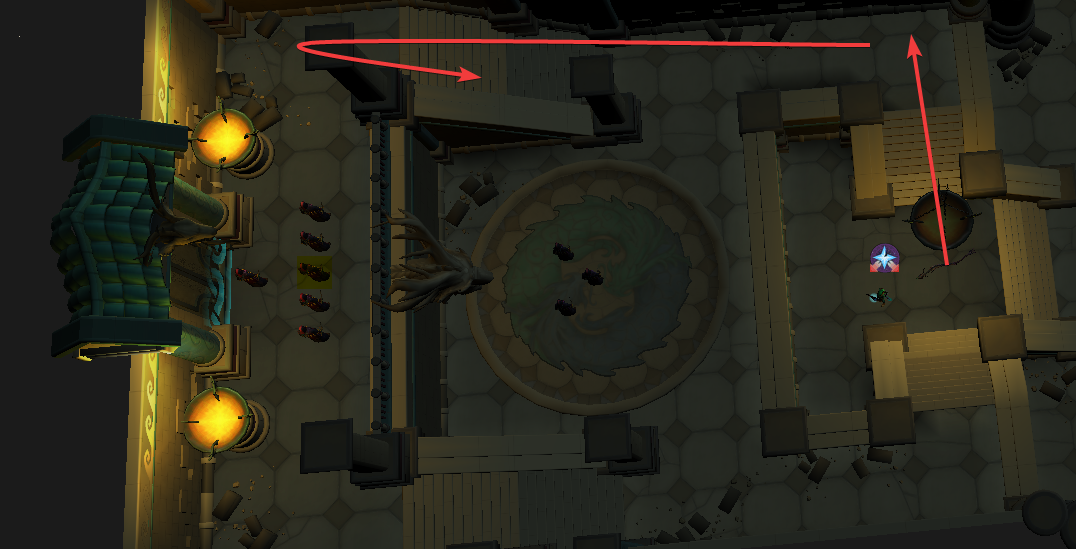
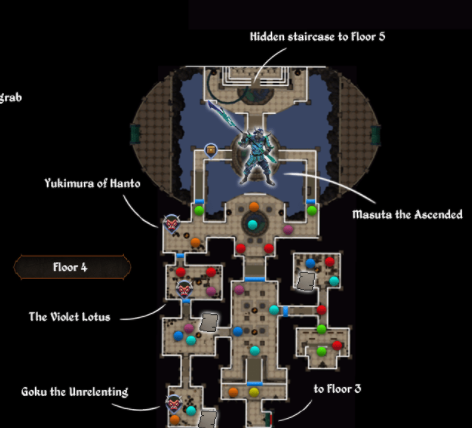
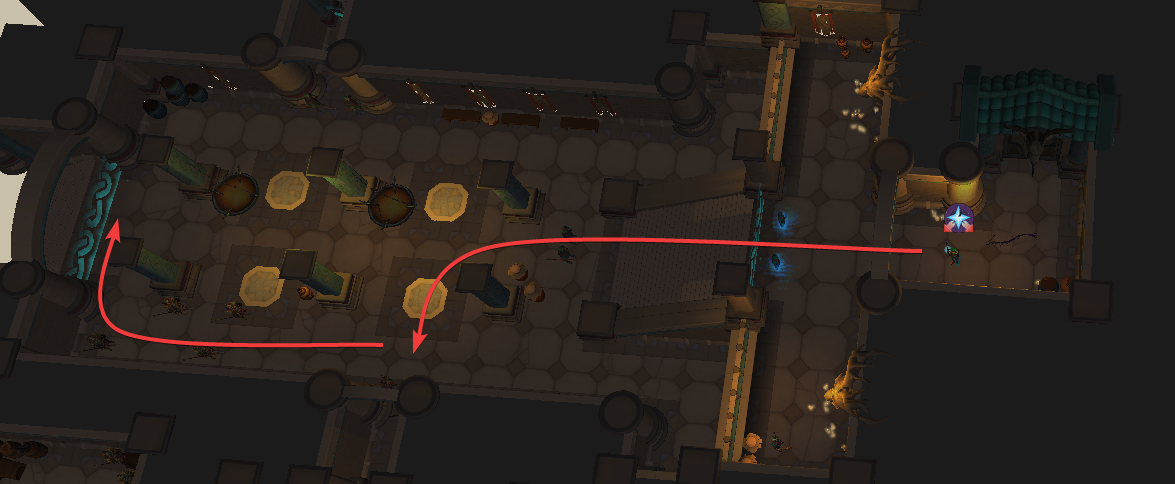
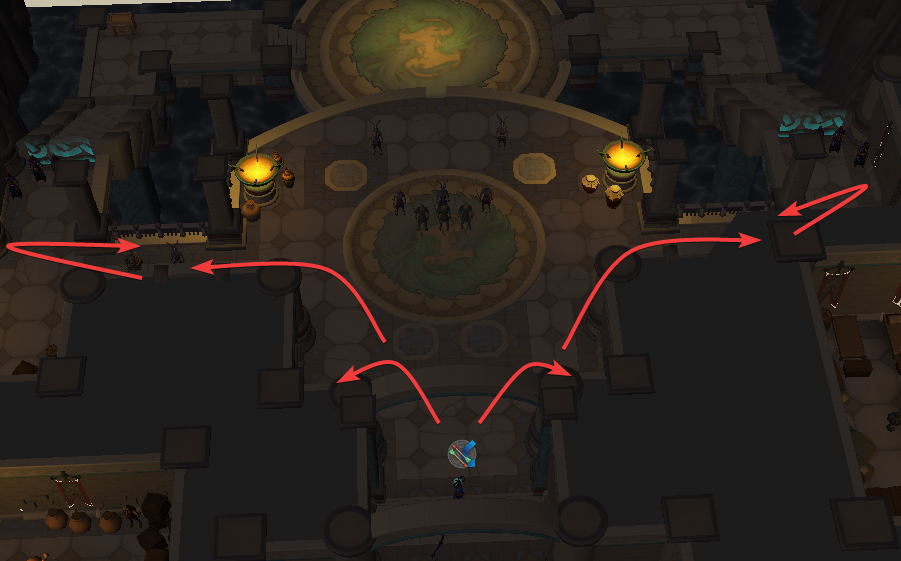
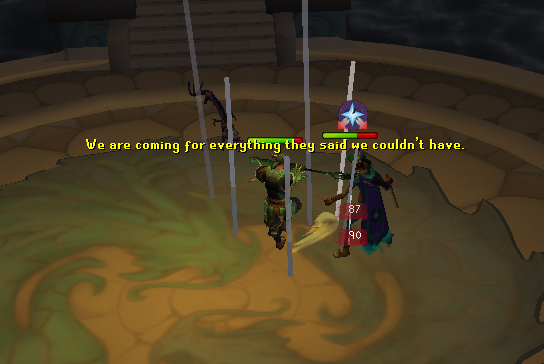
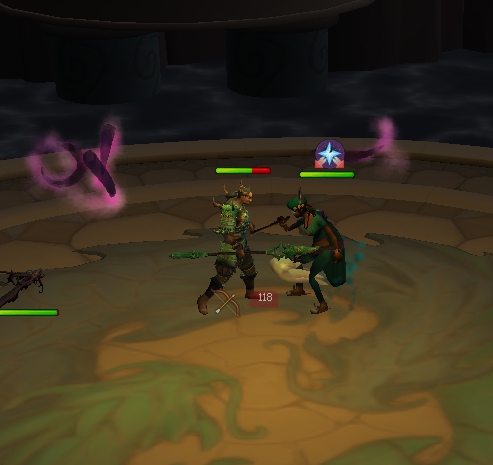
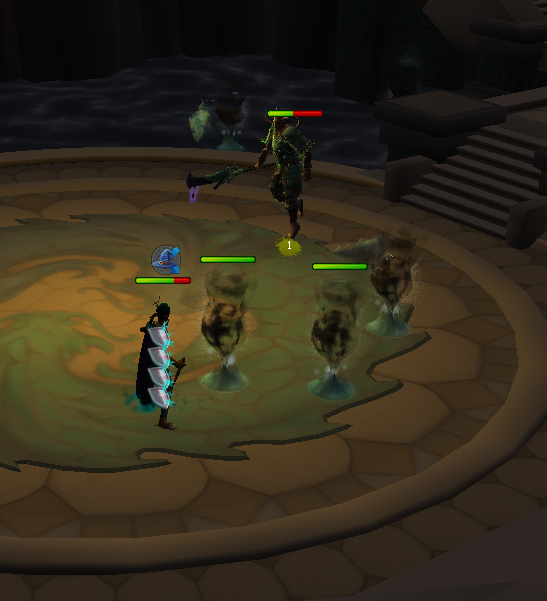
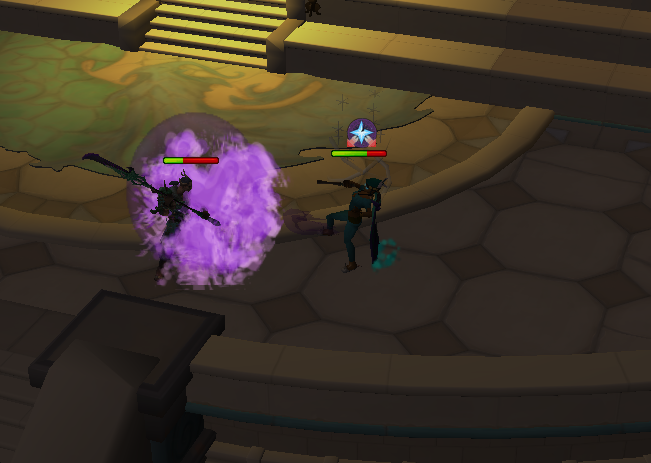
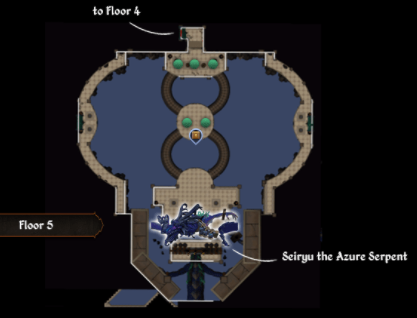
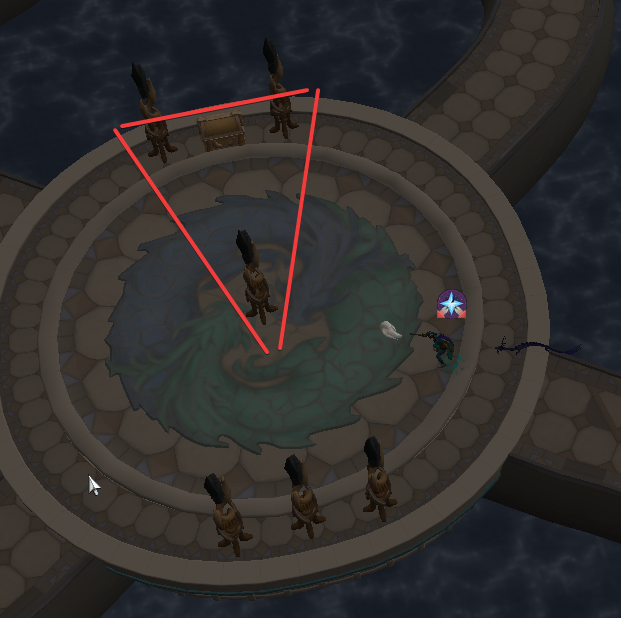

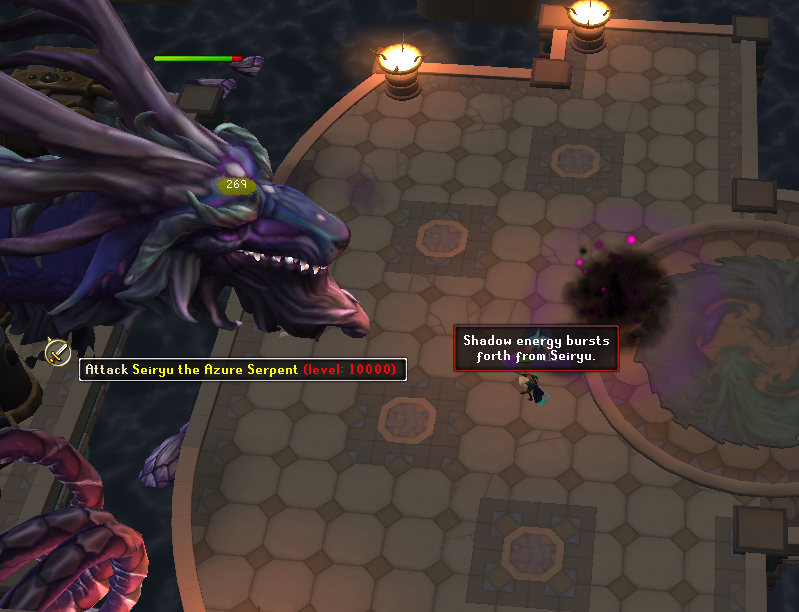
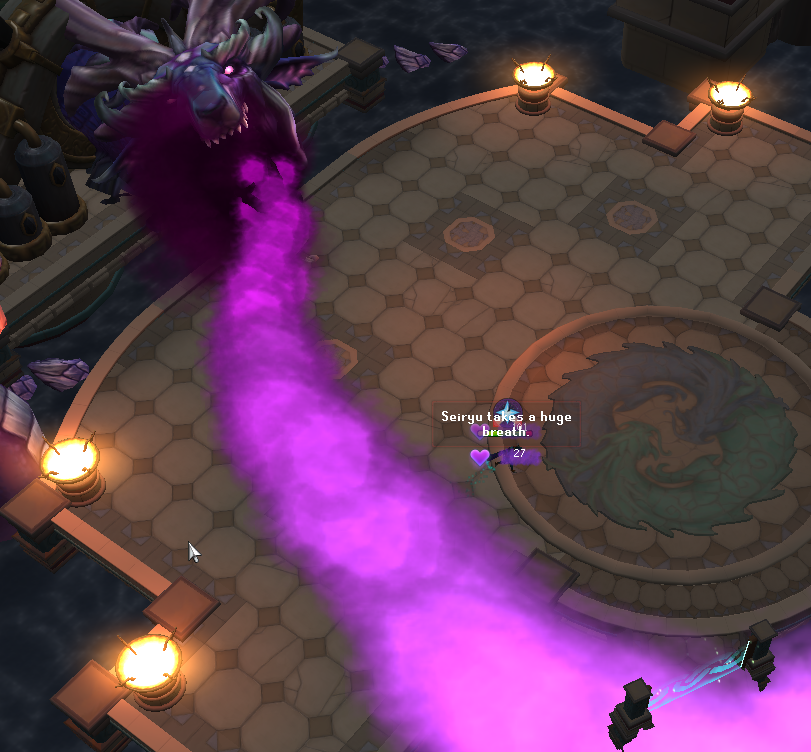
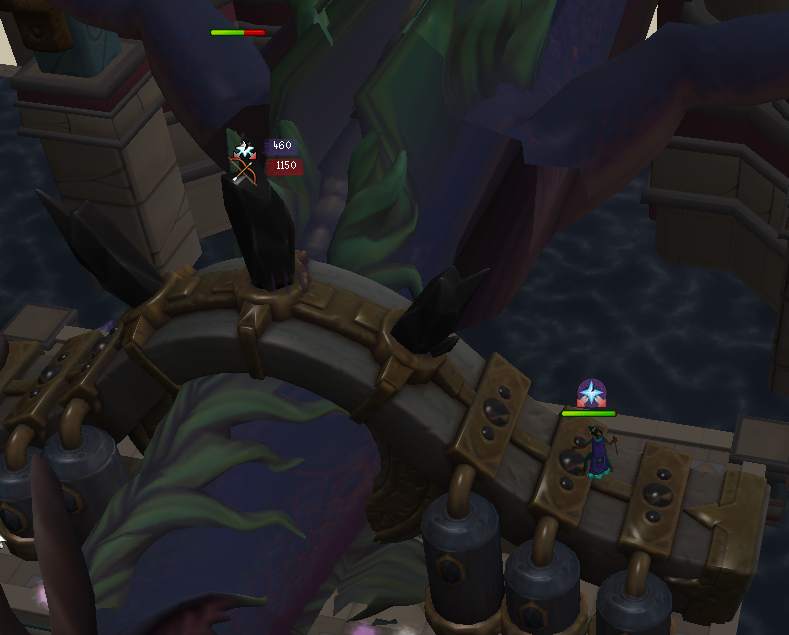
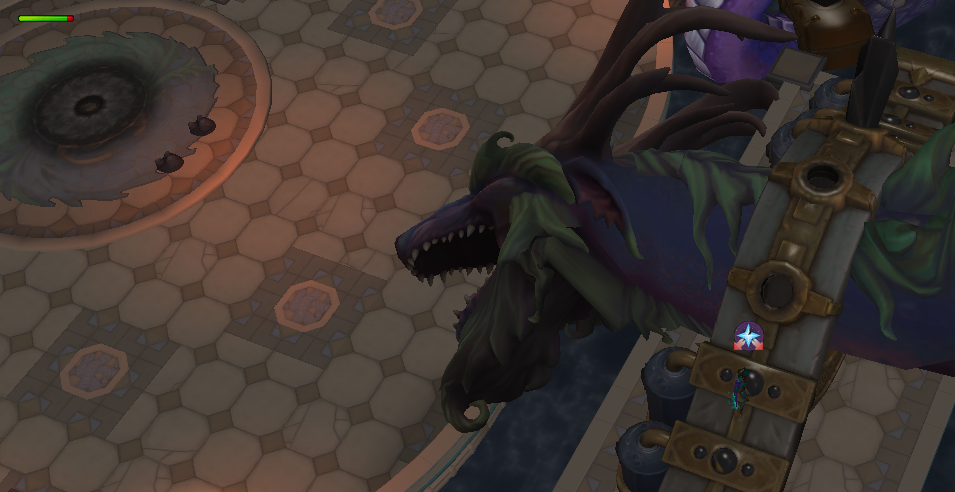
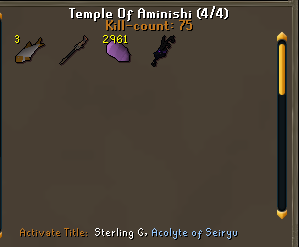
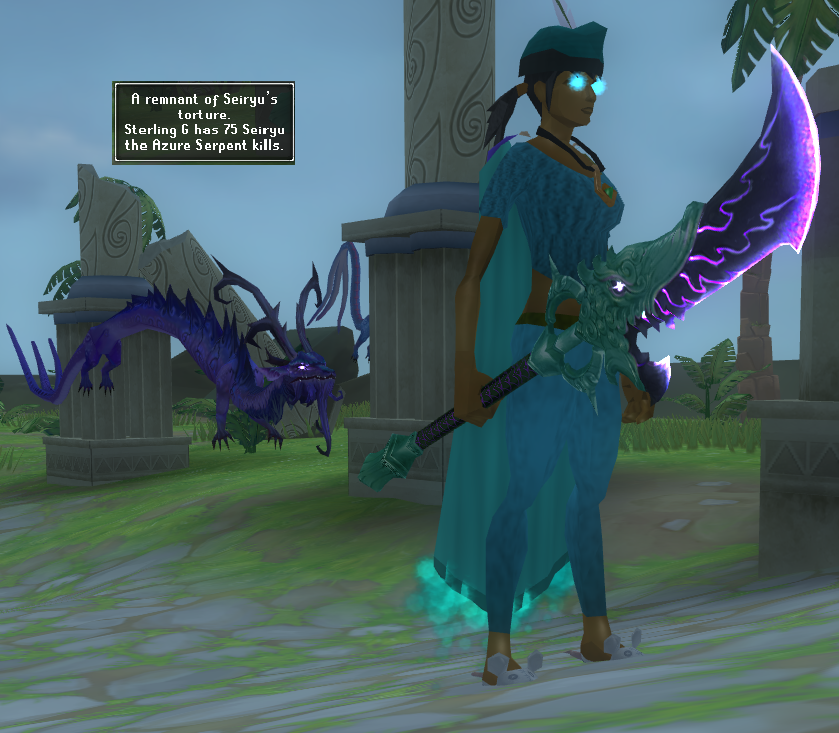
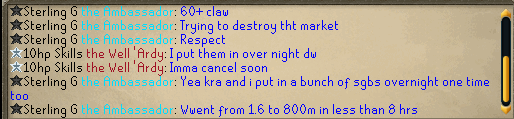
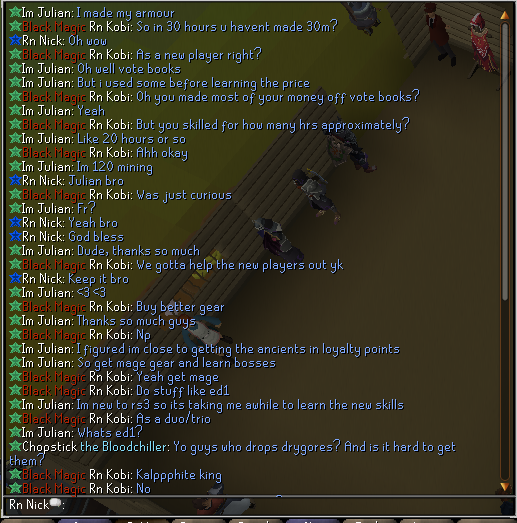
")


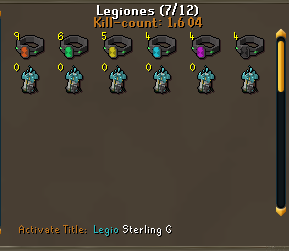
The thread with most replies..
in Off-Topic
Posted
take me back to november